An Introduction to WebGL — Part 2: Porting 3D Graphics
Introduction
In the first part of our WebGL series, we walked through a very simple introduction to WebGL, explaining what it is and how it can be used, and dissected a simple code example. From here on in, we will start looking at WebGL in more detail, focusing on individual tasks and techniques. This time, we’ll look at drawing more complicated models in 3D graphics editing applications, and porting them to WebGL.
The rationale
Most WebGL tutorials for beginners show you how to create very simple models, like cubes or spheres, however most real-world use cases will require something a bit more complicated than that. An easy way to create complex WebGL models is to draw your 3D models in a dedicated 3D graphics package and port them over to WebGL.
The porting process described in this article involves drawing your model in Google SketchUp Pro, Blender or Shade, exporting it to Wavefront OBJ format, and rendering it in WebGL using Three.js. There is no need to be a WebGL expert to have complex 3D models displayed on your website!
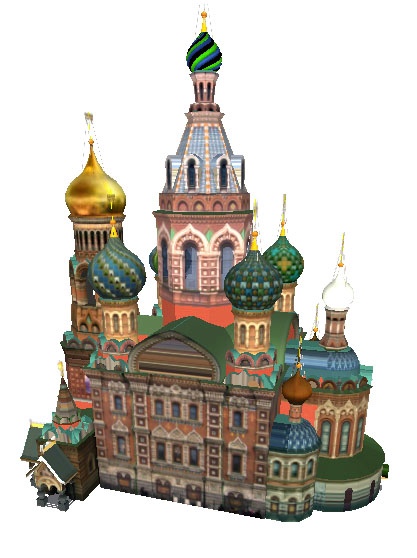
You can see an image of the end result in Figure 1: also view the live demo here. To see this demo you’ll need a browser that supports WebGL: a good choice is the latest version of Opera!
Note: We have started with the Wavefront OBJ format because the process of porting OBJ files into WebGL (without using professional graphics editing software) is more stable than that involved with the alternative Collada DAE format. We will cover using DAE files (and animations) with WebGL in a later article.
Creating and exporting models
In this section we will look at the process of creating models and exporting them to the OBJ format, in SketchUp Pro, Blender and Shade. Other applications that export to OBJ are 3ds Max, EIAS, Lightwave, Maya, Modo and Solidworks.
SketchUp Pro
Google SketchUp is a 3D graphics editing application created by Google. SketchUp Pro is its big brother and includes, among other things, the ability to export files to the OBJ format, which we will look at next.
Creating models with SketchUp is easy and intuitive even if you have no previous experience with other CAD applications. There are SketchUp Pro video tutorials available for different levels of expertise, and a large SketchUp 3D warehouse where you can find ready-made models for things like buildings, trees, furniture, machines, etc. You will need SketchUp Pro if you want to convert these models to OBJ (there’s a trial version available). In this example, I’ll use a model from Google 3D Warehouse, Church of the Savior on Spilled Blood by Arrigo Silva. You can choose any model you like or you can draw your own.
Note: Models in SketchUp 3D warehouse are user-contributed and while writing this article we found that a few of them were broken. These models would render correctly in SketchUp but would not export correctly and would appear broken when trying to render them from the OBJ in another application or using WebGL. This sometimes happens because 3D modelling is not only about the visible drawing but also about the skeleton that connects the visible parts and the consistency of the data that creates the mesh. If you’re having trouble rendering a model downloaded from the SketchUp warehouse (or of your own) and you think you’re doing things right, you may want to try again with another model because that’s where the problem may lie.
Once you have your model, you need to export it to Wavefront OBJ. If you only want to export one object out of the scene, select it now. Then, to export, go to File > Export > 3D model and select OBJ File in the format drop-down menu. Next, click on the Options… button to open the export options dialog box. To make the file compatible with the tools we’ll use to port it to WebGL, we need to have the following options checked (see Figure 2 for a visual representation):
- Export only current selection
- Triangulate all faces
- Export two-sided faces
- Export texture maps
- Swap YZ coordinates (Y is up)
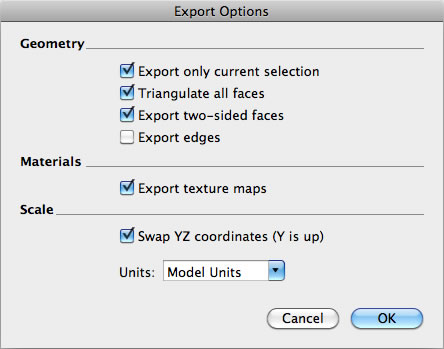
If you selected a particular object to export in the previous step, choose “export only current selection” to avoid exporting everything else (of course, export everything if you wish.)
Next, choose “swap YZ coordinates” to conserve the orientation of your model when ported to WebGL (the YZ axes are opposite in WebGL compared to how they are in SketchUp.)
All the other checkboxes need to be checked in order to maintain compatibility (learn more about the meaning of these options.)
Click OK, then Export to export.
Note: SketchUp is free, whereas SketchUp Pro costs $450 for a license. There is a trial version of SketchUp Pro available, which will give you 8 hours of cost-free OBJ exporting.
Once you have exported the file you should get an OBJ file, an MTL file, and all the image files that make up your textures.
The OBJ file is a text file that contains all the information needed to construct the 3D geometry of the model: the position of each vertex, texture coordinates, vertex normals, information about how vertices make up the faces, etc. An OBJ file also contains a reference to one or more MTL files. An MTL file describes the visual aspects of the model. It contains information about the materials applied to the surface of each polygon in the model, how they react in different lighting conditions, transparency, textures and so on. MTL files also reference the image files where these textures are stored in the form of texture maps. You need all the OBJ, MTL and image files to completely describe your model.
Blender
Blender is a free and open-source 3D graphics editing application that can be used to create models, animations and effects. It also allows you to export your files to the OBJ format: see below.
Blender has a reputation of being hard to use, but this refers largely to old Blender versions; Blender 2.60 shows a lot of improvements in its UI, and is a lot easier to learn. Although Blender has somewhat of a higher entry barrier than SketchUp, what makes it attractive and worth learning (besides being free!) is that it has more powerful features, for example you can add animations and effects to your models. These animations and effects can be exported to Collada and then rendered in WebGL (this will be explained in a later article), so if you are interested in potentially including animations and effects, you may want to make Blender your tool of choice.
Note: Compatibility is a bit hit and miss here, and the Blender 2.60 documentation is not clear on this point, but on testing, it appears that OBJ files exported from SketchUp Pro can’t be correctly imported into Blender.
There are Blender tutorials available to help you get started or refine your Blender skills, and Blender 3D: Noob to Pro is a great book. You can also find many models to download and play with at The Blender Model Repository.
Note: The instructions for exporting to OBJ in Blender in this article may seem a bit difficult to follow if you’re not familiar with Blender. We recommend that if you’re not already familiar with it, you complete some Blender tutorials and become familiar with the Blender UI before you try out these instructions.
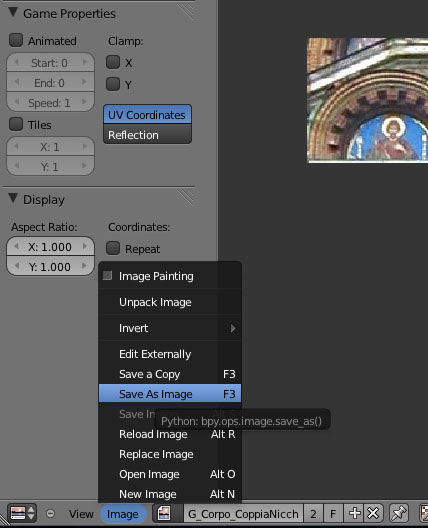
One thing to bear in mind when using Blender is that textures may not managed automatically for OBJ export (in version 2.60 they are not, but texture management varies by Blender version). This means that, if for example you’re using Blender 2.60, image files with texture maps will not be exported automatically together with your OBJ and MTL files. So if you’re creating a model with Blender 2.60 and decide to add some textures to it, be sure to do the following, if you’re drawing your textures by yourself instead of applying a pre-made texture image:
- On the UV view (where you draw textures), save the texture as an image file once you’ve finished designing it — see Figure 3 for a visual representation.
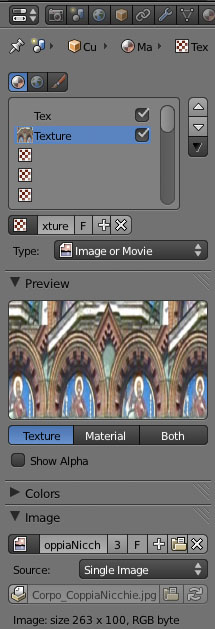
- Once you have saved the image, apply the image as a texture checking it in the in the Textures tab, found in the Default view, as seen in Figure 4.
- When you export to OBJ and get your OBJ and MTL files, your MTL file will then already point to the right image files, and the only thing you’ll need to do is include these image files in a subdirectory inside your working directory when carrying out the later steps.
Otherwise, if you’re applying pre-made texture images, just include these image files in a subdirectory inside your working directory when carrying out the later steps.
Note: It is beyond the scope of this article to explain how to design and apply textures in Blender, but you can find instructions on this in the Blender 3D Noob to Pro texture tutorial. Remember that Blender is a powerful but complex tool: if you have never used it before, we’d recommend that you follow some beginner tutorials before you start making textures wit it.
After the images have been correctly saved and the textures have been applied, it’s time to export the model. As with SketchUp Pro, in order to make OBJ files compatible with the tools we’re going to use to port it to WebGL, we need to make certain choices when exporting. To do so, follow the steps below (based on the three.js page instructions, written by AlteredQualia.)
The exact options that you have to choose in the exporter depend on your Blender version because the interface varies between versions. The below steps worked for us in Blender 2.60, so that’s what we’d recommend!
- Remove the default cube using the Delete button on the left hand side.
- Select all meshes Select > Select All by Type > Mesh
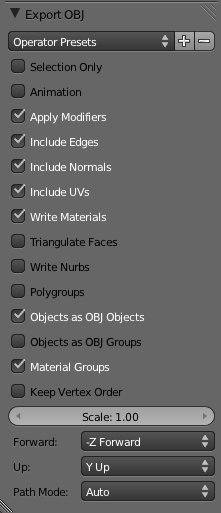
- Choose Export to OBJ File > Export > Wavefront, making sure the following options in the exporter are checked:
- Selection Only
- Apply Modifiers
- Include Normals
- Include UVs
- Write Materials
- Triangulate Faces
- Objects as OBJ Objects
- Material Groups
- Keep Vertex Order
- Click Export Obj to export.
You can find some information about what these options mean in the Blender wiki. Here’s a screenshot of what worked for us in Blender 2.60:
If everything goes well, you should now have an OBJ file and an MTL file to go with all the image files that make up your textures.
Shade
Shade is a 3D modelling, rendering, and animation tool available from E Frontier, a Japanese software company: it is easy to use and has more powerful features available like complex animations. It also handles a large variety of formats, including Collada DAE and Wavefront OBJ, and also direct imports from Google SketchUp (using the SKP format). Shade also offers photo modelling, the ability to generate a 3D model from 2D images and apply textures extracted from those images. Shade has three versions: Basic (US$99), Standard (US$ 349), and Pro (US$749), and you can get a 30 day trial version of the Basic and Pro versions (Shade version comparison). All three versions (and both trials) support SketchUp import and OBJ export.
You can find Shade documentation, tutorials and manuals in ShadeCamp, the information portal for Shade.
To create an OBJ version of a model in Shade, open it up, then select File > Export > Wavefront (see Figure 6). Choose the following options:
- Max vertices per face: 4-sided
- Normals (Smoothing)
- UV Value
- Invert V Value
- Material file
- Create texture folder
- OS (choose your OS)
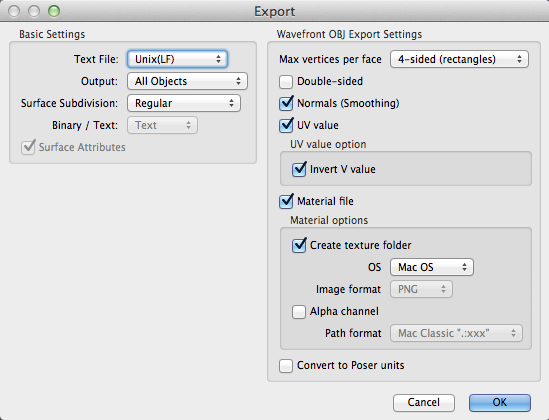
As you can see, Shade offers the possibility of exporting materials by creating a texture folder so the images for the textures are exported automatically. Here, we’ve selected to export all objects as Output, but you can choose to export only selected items if that’s what you want. All the other choices are necessary for compatibility with the next steps of the process of rendering them in WebGL.
Rendering OBJ files in WebGL
In order to render the model in WebGL we can use Three.js. Three.js is a JavaScript library that provides a JavaScript wrapper for WebGL. Three.js doesn’t directly handle OBJ files — first you have to convert them to JSON — but luckily Three.js also provides a script that does this for you.
Converting OBJ to JSON
Files can be converted from OBJ to the JSON format expected by Three.js using convert_obj_three.py, written by AlteredQualia. The script includes detailed instructions on how to use it. The defaults should simply work, so let’s just run it like this:
- Download the convert_obj_three.py library and place it in the same directory as your OBJ file.
- Open up your terminal/command line, and navigate to said directory.
- Run the following command:
python convert_obj_three.py -i infile.obj -o outfile.js
If you are changing the location of the files before running the script, bear in mind that OBJ or MTL files use relative paths.
Once you run the script successfully, you will get a JS file containing the JSON for your model. You will need this file and the image files for the next step.
Rendering the model
Once the model is done, it’s time to finally write some code. In this code we’ll include only the basic WebGL features that you need to render your design and rotate it in order to inspect the end result. You can take this example and experiment, adding your own model, making changes to the basic stuff that’s there already, or even adding a few things of your own design. The code we’re going to use is adapted from the Three.js example webgl_objconvert_test.html (which you can find in the examples folder when you download Three.js). You can find my finished WebGL example here. There are getting started with Three.js tutorials available, as well as a Three.js API reference.
The very first thing you need to do is to download Three.js from the Three.js Github repo. When you unarchive Three.js you’ll find, inside the main folder, among other things, a folder called examples. Here you can find some Three.js demos (you may want to check them out later for more sample code and ideas). We’ll start our own new file here in the examples folder and then follow the next steps.
Note: If you’re not using Opera, you may need to serve the folder through a web server for the example to work.
To start with, create a simple skeleton HTML file of your choosing. The next code snippet shows the things you’ll need to import — add this into your HTML <body>
<script src="scripts/three.js"></script>
<script src="scripts/detector.js"></script>
<script src="scripts/raf.js"></script>
The first line imports the main Three.js library, while the 2nd and 3rd import useful scripts that come bundled with Three.js, and can be found in the js folder (inside the examples folder):
- Detector.js is a clever bit of code written by MrDoob and AlteredQualia that detects if a visitor’s browser supports WebGL. If it doesn’t it shows them where they can download an updated version of their preferred browser that does.
- RequestAnimationFrame.js is a script by Paul Irish that provides access to the requestAnimationFrame API in a cross-browser way. The requestAnimationFrame API allows you to animate a scene in a way that’s optimized inside the browser, making your code more efficient. You can read more about requestAnimationFrame here.
Now it is time to start writing our own script: add the following below the previous <script> blocks. This first block of code checks that the browser supports WebGL, and defines some variables:
if (!Detector.webgl) Detector.addGetWebGLMessage();

var SCREEN_WIDTH = window.innerWidth;
var SCREEN_HEIGHT = window.innerHeight;
var FLOOR = 0;

var container;

var camera, scene;
var webglRenderer;

var zmesh, geometry;

var mouseX = 0, mouseY = 0;

var windowHalfX = window.innerWidth / 2;
var windowHalfY = window.innerHeight / 2;
Like I said before, we’ll keep things simple for now, so we’ll provide only the basic features needed to render a model. However, we will add some basic interaction to allow users to rotate scene, so they can appreciate the 3D model, and we can check that it has loaded correctly. Add the following code below the previous block:
document.addEventListener(
	'mousemove',
	onDocumentMouseMove,
	false
);
init();
animate();
The mousemove event listener is there to provide this interaction. Like their names indicate, init() and animate() respectively initialize and animate the WebGL application.
Now let’s take a look at the functions that make things happen. Add the following, again at the bottom of the previous block:
function init() {
	container = document.createElement('div');
	document.body.appendChild(container);

	// Camera
	camera = new THREE.PerspectiveCamera(
		75,
		SCREEN_WIDTH / SCREEN_HEIGHT,
		1,
		100000
	);
	camera.position.z = 75;

	// Scene
	scene = new THREE.Scene();

	// Lights
	var ambient = new THREE.AmbientLight(0xffffff);
	scene.add(ambient);

	// More lights
	var directionalLight = new THREE.DirectionalLight(0xffeedd);
	directionalLight.position.set(0, -70, 100).normalize();
	scene.add(directionalLight);
}
In order to initialize the WebGL application, we create the different elements that compose it.
- First we’ll create a div where everything will be contained.
- Then we create a camera (
[THREE.PerspectiveCamera][52]), indicating its field of view, its aspect ratio, and the closest and farthest distances that will be captured by the camera (near and far). We also set the camera position for the z axis (depth). - Then we create a scene (
[THREE.Scene][56]) and add some lights ([THREE.AmbientLight][57]and[THREE.DirectionalLight][58])
Now it’s time to add the model. For this we create a new [WebGLRenderer][59]. The WebGLRenderer is an object that, among other things, has the attribute .domElement — the <canvas> element that will house the WebGL application. Add the following:
// Renderer
webglRenderer = new THREE.WebGLRenderer();
webglRenderer.setSize(SCREEN_WIDTH, SCREEN_HEIGHT);
webglRenderer.domElement.style.position = 'relative';
container.appendChild(webglRenderer.domElement);
Then we load the model, and call the function createScene(). Add this next:
// Loader
var loader = new THREE.JSONLoader(),
callbackModel = function(geometry) {
	createScene(geometry, 90, FLOOR, -50, 105)
};
loader.load({
	model: 'obj/church/church.js',
	callback: callbackModel
});
As part of this step, make sure you change the path to the church.js file to point to your own JSON file, as created in the previous stage.
The function createScene() creates a model from geometry and materials using [THREE.Mesh][60] and then positions, scales and adds this model to the scene. We’re not really scaling our model in this case od the demo example, but the reason we’re including this line anyway is that more likely than not you’ll have to scale yours to make it display properly if you’re using our code as a template and using your own model. Add this:
function createScene( geometry, x, y, z, b ) {
	zmesh = new THREE.Mesh( geometry, new THREE.MeshFaceMaterial() );
	zmesh.position.set( 0, 16, 0 );
	zmesh.scale.set( 1, 1, 1 );
	scene.add( zmesh );
}
Next we’ll add the following bit of code, which grabs the mouse movement and stores it for later, when we compute the rotation:
function onDocumentMouseMove(event) {
	mouseX = (event.clientX - windowHalfX);
	mouseY = (event.clientY - windowHalfY);
}
And finally, we’ll add the animate() function, which animates and renders the scene, and the render() function, which computes the rotation:
function animate() {
	requestAnimationFrame( animate );
	render();
}

function render() {
	zmesh.rotation.set(-mouseY/500 + 1, -mouseX/200, 0);
	webglRenderer.render(scene, camera);
}
Summary
I hope this article convinced you that you don’t need to be a WebGL expert to include cool 3D models on your website. Now you know how to convert your own 3D models using SketchUp, Blender, or Shade (or any other 3D graphics software that lets you save to OBJ) and render them in WebGL using Three.js. If you’ve not followed the walkthrough and built your own, access the live demo code here and start trying your own ideas. Here are some links you may find useful:
- Get SketchUp and SketchUp Pro
- SketchUp tutorials
- Get blender
- Blender tutorials
- Blender 3D: Noob to Pro, a Blender manual
- Get Shade
- ShadeCamp, the information portal for Shade with documentation, tutorials, manuals, etc.
- Get convert_obj_three.py
- Get three.js
- Three.js API reference
- Cool getting started with Three.js tutorial in case you want to add more models, effects and animations to your WebGL application
Keep an eye on Dev.Opera for the next part of this tutorial!