Working with Web Notifications using PubNub’s Realtime Data Stream
Notifications are a great way for apps to indicate that they have something to tell you, for example, that you’ve received a new Twitter message.
The W3C Web Notifications API allows your web browser to display notifications as well: it is a great way to engage with your users because these notifications can be displayed even when the page is not active — note however that the page must be opened in a background tab for the notification to be triggered. The W3C doesn’t specify how notifications should look, so Opera has chosen to use native notifications so that your browser feels completely integrated with your operating system.
Web Notifications have been supported by Opera since version 25. The article Web Notifications in Opera Developer 25 describes the basic use of the API.
Today, I am going to show you how to use Web Notifications by creating an interactive multi-user app using PubNub’s realtime data stream JavaScript APIs.
What is the PubNub Data Stream Network?
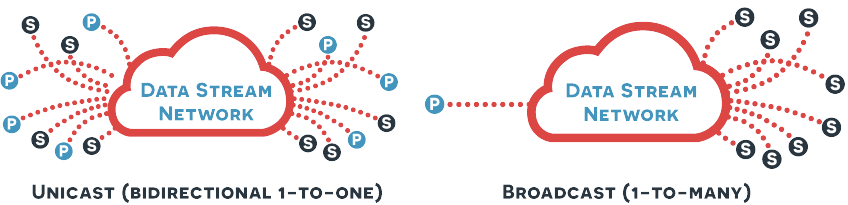
PubNub is a secure global Data Stream Network that enables developers to build, scale, and manage realtime functionality for their applications and IoT devices. It uses a publish/subscribe model, and its APIs are straightforward to use. (Full disclosure: I work for PubNub)
What we’ll be building
For this article, I made an alternative version of the “Yo” app, which allows you to send the message “Yo” to your friends. With the “Oi” web app, instead of sending a message to your friends, you can send “Oi” to strangers online.
Let’s get started!
Checking for API support
The first step is checking if the Web Notifications API is supported by the user’s browser. This feature detection step is good practice and currently needed since not all browsers support the API yet.
For this exercise, let’s just simply terminate the app when the browser doesn’t support the API, since this app is useless without notification capability. When you’re building a real web app, you should of course try to provide a nice fallback for an optimal user experience.
if (!window.Notification) {
	alert('Oops, your browser does not support the Web Notifications API!');
} else {
	// Go ahead and use the Web Notification API.
}
Requesting permission
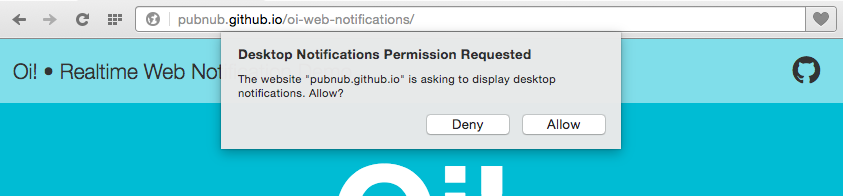
Each browser provides a built-in permission UI for the Web Notification API, so that you can control which web pages can send you notifications. When your page is loaded for the first time, a browser-specific permission dialog is shown to the user. After the user has granted permission, your page can send notifications, otherwise (denied), it can’t.
Notification.requestPermission(function() {
	if (Notification.permission === 'granted') {
		// Now your page can send the user notifications!
	}
});
Try for yourself and see. You can always reset the permission setting by going to opera://settings, selecting Websites from the left column, and scrolling down to the Notifications section.
Connecting users using PubNub Data Stream
Once the user has granted permission, the next interaction you expect is that they enter a name in order to get started.
<input type="text" placeholder="Type your name to start" autofocus>
When the user enters a name, then hits the return key (we’re listening for a keyup event with a keyCode === 13), we send the username to the PubNub stream to register the user.
document.querySelector('[type="text"]').addEventListener('keyup', function(event) {
	if (event.keyCode !== 13) return;
	if (!input.value) return;
	username = input.value;
	// Connect PubNub and register the user …
});
Initializing PubNub with user info
This requires your own PubNub API keys, so you need to sign up for a free account. Your publish/subscribe keys are in the Developer’s Admin Dashboard.
Then, include the PubNub JavaScript libraries in your HTML.
<script src="https://cdn.pubnub.com/pubnub.min.js"></script>
Now, let’s initialize the PubNub client API environment, with the user’s username as a uuid (unique identifier). Also, we create a channel called “oi”.
var channel = 'oi';
var pubnub = PUBNUB.init({
	subscribe_key: 'your_sub_key',
	publish_key: 'your_pub_key',
	uuid: username
});
Populate a list of users using presence detection APIs
You can subscribe the channel for the client to the PubNub network to create an open TCP socket and begin listening for messages.
PubNub also provides “presence detection”, which allows you to check up on your users’ presence status, for instance, when they come online and when they leave. This feature is useful to populate an up-to-date list of every user currently subscribed to a channel.
In this demo, we update the DOM with the current list of users you can send “Oi” messages to, using PubNub’s here_now APIs. The following function is called each time each time a user joins or leaves. (The subscribe API is explained later).
var updateList = function() {
	pubnub.here_now({
		channel: channel,
		callback: function(m) {
			// get current users and update DOM
		}
	});
};
To make this article simple and focus more on the essential parts, I’m skipping the details of presence detection, but you can always take a look at the source code to see how it is done!
Sending messages
When the user clicks a username in the list, the app will publish a message. The publish() function is used to send a message to all subscribers of a channel. You can simply pass an object as a message payload. In this demo, only from and to info is passed but you can send any messages in the object.
var list = document.querySelector('.list');
list.addEventListener('click', function(event) {
	if (!event.target.id) return;
	pubnub.publish({
		channel: channel,
		message: {
			from: username,
			to: event.target.id
		}
	});
});
You can pass an object with any data you want as the message. So instead of the default “Oi!” message, you can also modify the script and allow your users to send custom messages.
Receiving messages
When somebody sends the user a message, the web app will trigger the browser to display a notification.
To make to this demo very simple, rather than establishing a 1-to-1 private connection, we let our web app broadcast messages to all users simultaneously. However, only a designated person will receive a web notification.
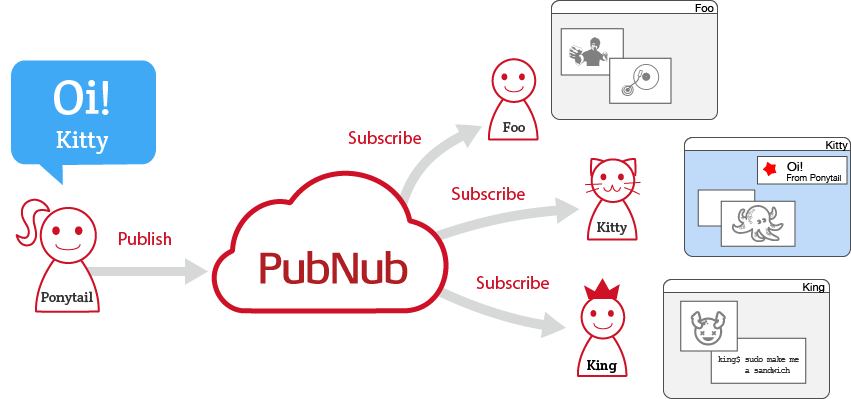
To retrieve the live messages, you simply use PubNub subscribe() API. If the message is sent to a particular user, that user will see a notification.
pubnub.subscribe({
	channel: channel,
	callback: function(message) {
		if (message.to === username) {
			showNotification(message);
		}
	}
});
Displaying a notification
Creating a web notification is super-simple: just call the Notification constructor.
var notification = new Notification(title, options);
The title must be a string, and options may contain an object with the properties:
dir(direction, can be eitherauto,ltr, orrtl. Used with bidirectional text)lang(language)body(extra text)tag(used to coordinate multiple instances)icon(the URL of an icon image)
Let’s complete the showNotification function. This displays a notification, and closes it after 30 seconds. If you would like to leave it until the user dismisses the popup, just omit the last part.
The tag member is used by each instance to coordinate how many notifications to show. For example, even if you have the app opened in multiple tabs with the same username, you only receive one notification popup when they share the same tag.
function showNotification(data) {
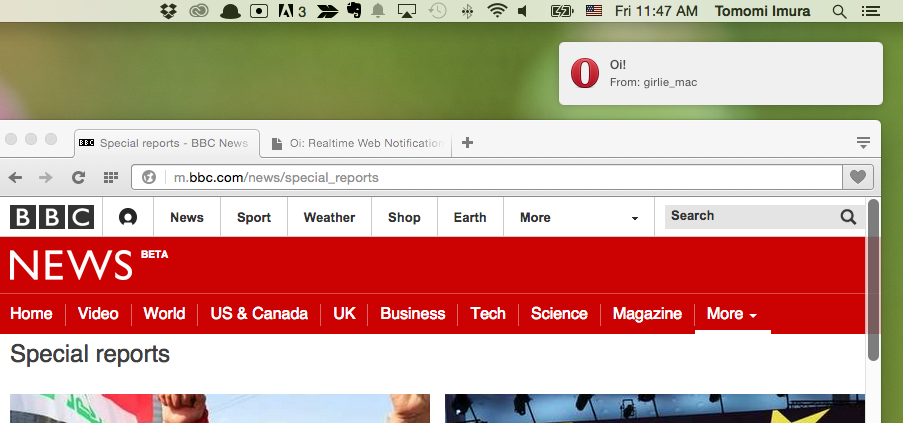
var notification = new Notification('Oi!', {
body: 'From: ' + data.from,
tag: channel,
icon: 'images/oi.png'
});
notification.onshow = function() {
setTimeout(notification.close, 30000);
};
}
Ta-da! Now you can annoy random strangers online by sending them an “Oi!” message. The entire source code is available on GitHub.
This demo is very basic, and quite frankly, a bit silly, but web notifications can be really interactive and useful when you use them wisely!