Electronics for the JavaScript Developer using Wi-Fi and Bluetooth LE
Introduction
The Internet of Things is gaining momentum in the recent years as more embedded computing devices are being connected to the Internet. What does this mean for us web developers? This article will explore two common wireless protocols, Wi-Fi and BLE and will take you through the starting steps in connecting sensors and servo motors to the Internet. Then we will learn how to control these devices and access the sensor data using JavaScript!
In this article we will explore two platforms: Spark for Wi-Fi and TI Sensor Tag for BLE with practical examples. At any time, you can also look at the complete annotated code for each example. It will be fun!
Pre-requisites
This article assumes that you are already an intermediate to advanced level JavaScripter. We will primarily use node and npm for server side and simple frontend JavaScript to create some control UI on a web browser. You don’t need any prior knowledge of electronics. Seeing you can effect change and gather data from the physical world can be exciting and I hope through this article you will get that first excitement to dive into the fun world of electronics and web technologies! Let’s get started!
Spark and Wi-Fi
One of the reasons why Spark is a great platform especially for any electronics beginner are its detailed documentation as well as the community forum. In this section, we will play with a light sensor and then control a servo from the web browser. Let’s first list the electronics components you will need so that you can buy them if you want to physically follow through the examples:
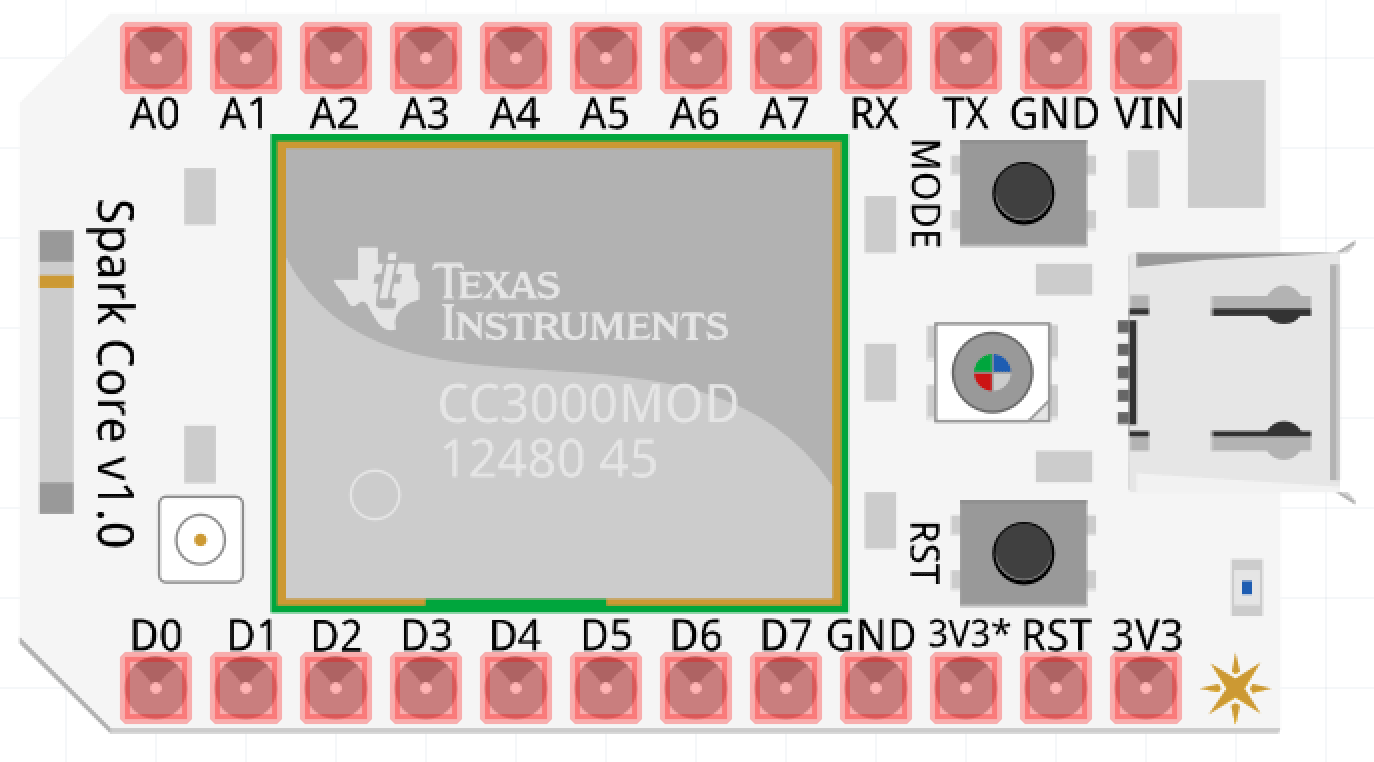
Spark Core
Breadboard
Horizontal rows
- Red: HIGH or Vin (~6V)
- Blue / Black: LOW or Ground (0V)
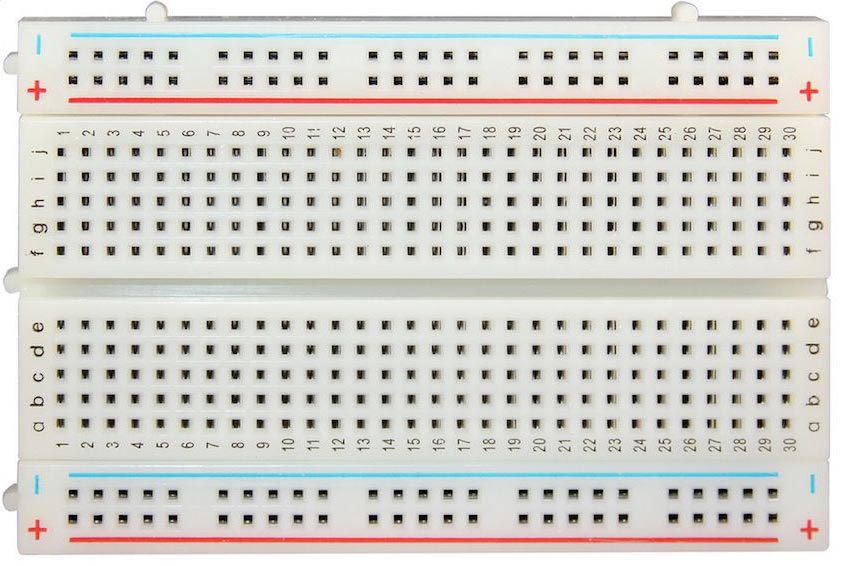
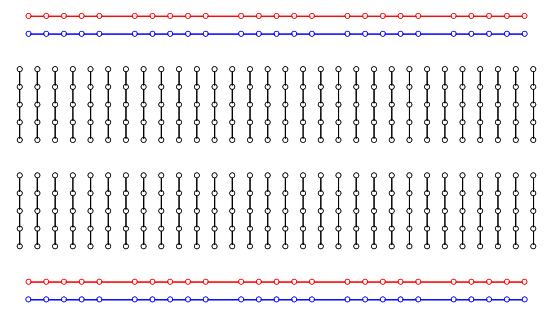
You will get a breadboard when you buy the Spark Core
Micro-B to USB cable
You will get this cable when you buy the Spark Core or this might be your mobile charger.
Jumper cables
Tip: Use the same color wires as the schematic so that it will be faster to trace the wires for debugging. E.g. use Red for power and Black for ground.

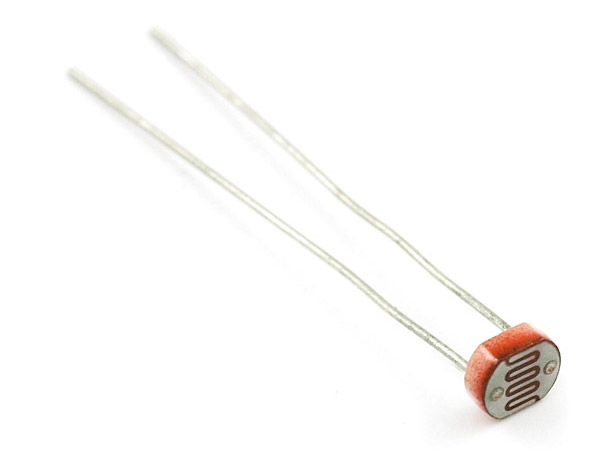
Light dependent resistor: LDR or photocell
Tip: LDR has no polarity, so either leg can be connected to the analog pin or the ground.
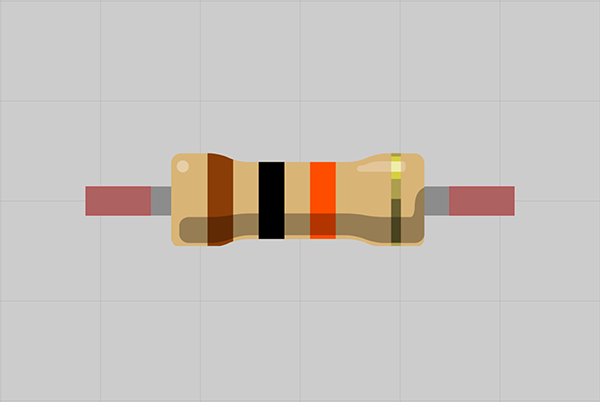
1k ohm resistor
Tip: Resistor has no polarity, so either leg can be connected to the analog pin or the ground.
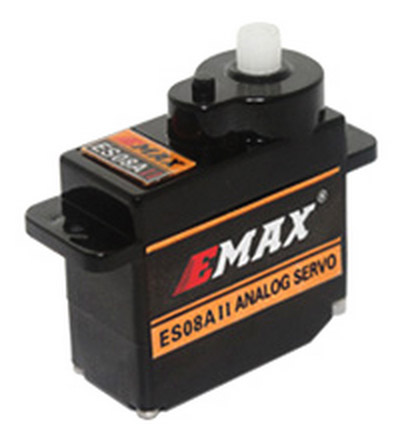
Servo
Tip: For wiring — Yellow is Signal, Orange is +5V (VIN), Brown is ground
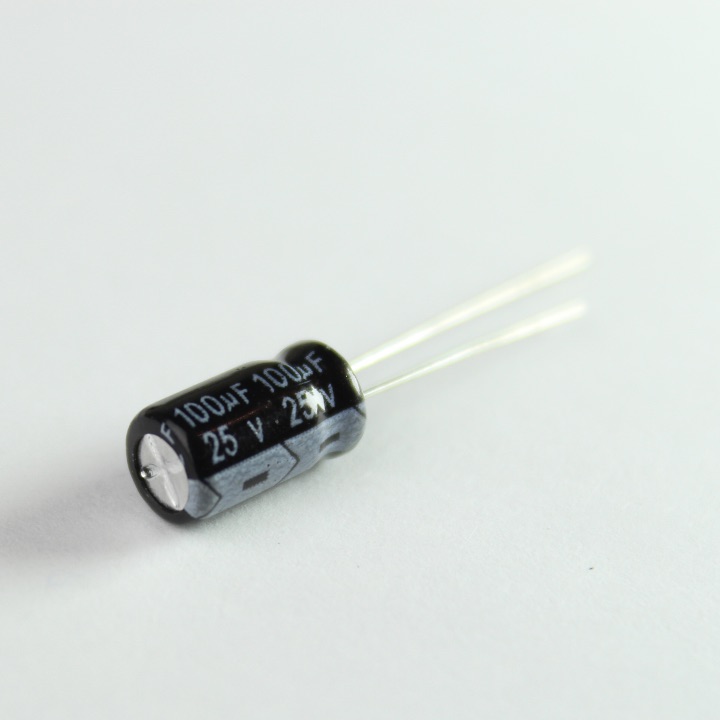
10 micro Farad Capacitor
Tip: The capacitor used in this example has polarity. On the plastic above one of the pins you’ll see a light colored strip with a negative sign – on it. Always connect that pin to GND pins or rails.
1. Setup
In this section, we will connect the Spark Core to your Spark account and then connect it to the local Wi-Fi. To setup the Spark Core, signup for an account. Then connect the Spark Core to your laptop via the USB cable. You should see a fast-paced blinking blue light which means the Spark Core is waiting for Wi-Fi credentials.
To associate the Spark Core with your account (also known as “claiming the core”), we will use the spark-cli module. Next, we will give the Spark Core our local Wi-Fi credentials so it can connect to the Wi-Fi network.
$ npm install -g spark-cli
$ spark setup # connect the Spark Core to your account
$ spark setup Wi-Fi # connect the Spark Core to your Wi-Fi
If you have setup the Spark Core correctly, you will see a breathing cyan light as shown below.
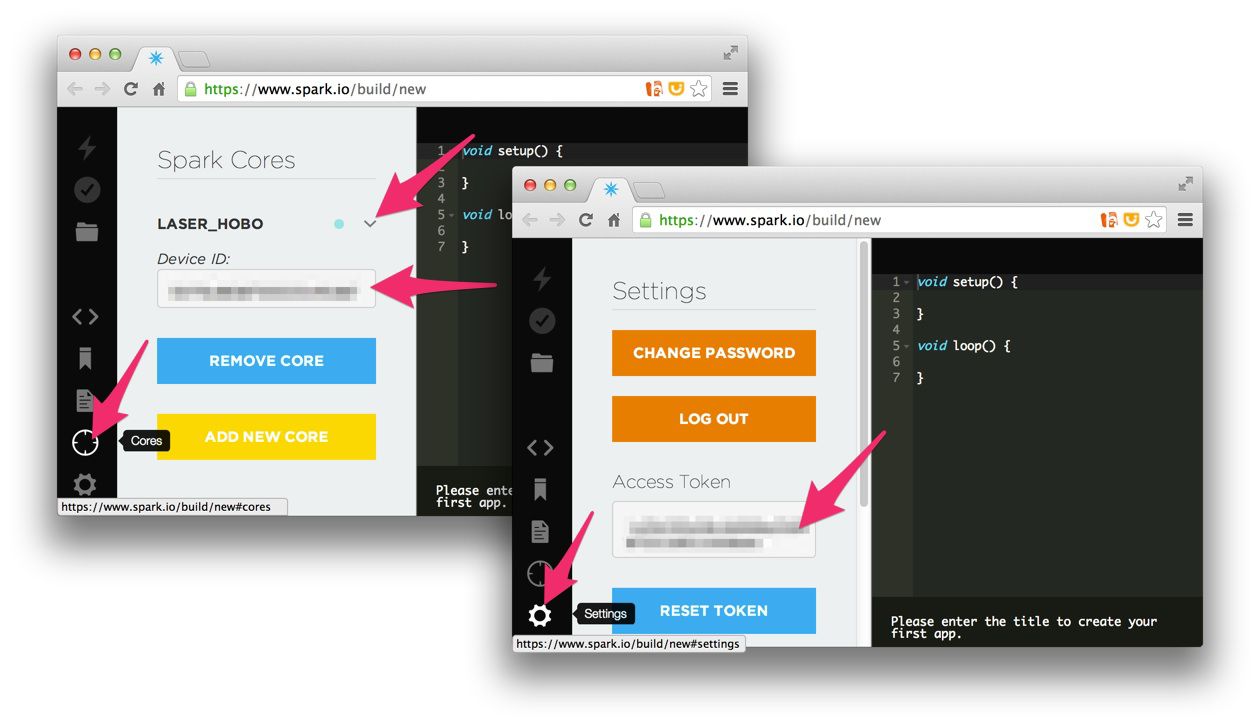
Next, we will note down two important values (device id and access token) for your Spark Core that will be needed for any secure communication. Open Spark’s web editor, Spark Build for this and note down these 2 values.
In the next couple of sections we will go through two examples. These two examples show two different ways you can use Spark:
- Sensing with an LDR (light dependent resistor) with:
- firmware code that will publish the sensor values
- spark npm module to pick up the values periodically
- Moving a servo with buttons on a web browser with:
- pre-built firmware code voodootiki spark
- express, spark-io and johnny-five npm modules to built a simple button that can turn the servo from the browser
2. Sensing photocell values
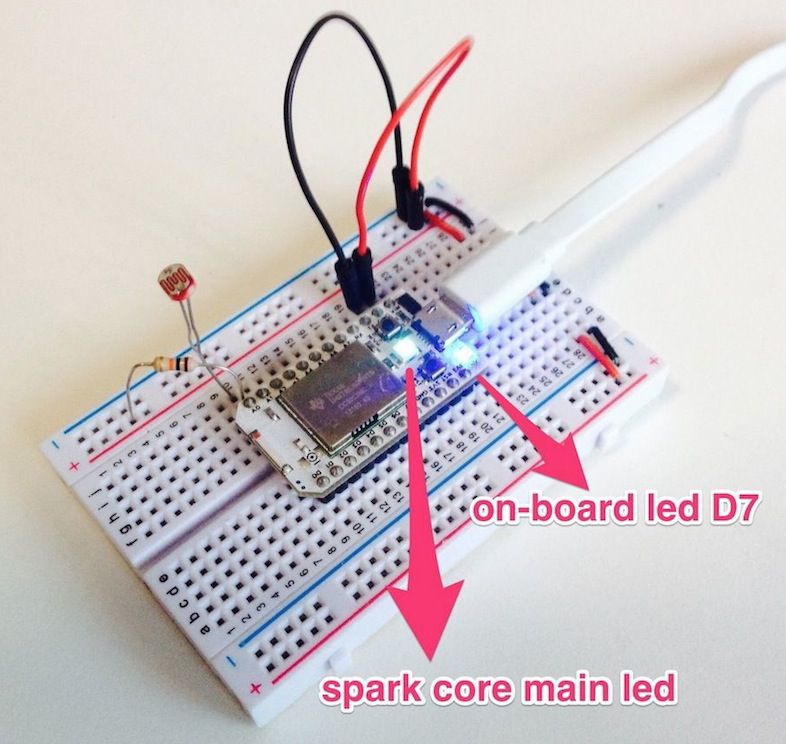
Blink the on-board D7 LED.
As the very first step, we will learn how to blink an LED. This is the hello world of electronics. Open the Spark web editor and copy the simple blinking LED code. Here it uses a simple firmware code to blink the on-board LED D7 every 1 second. To flash the firmware code onto your Spark Core, click the flash icon at the top of the left sidebar and wait for the LED on board to come back to the breathing cyan pattern. You should see the LED D7 blinking.

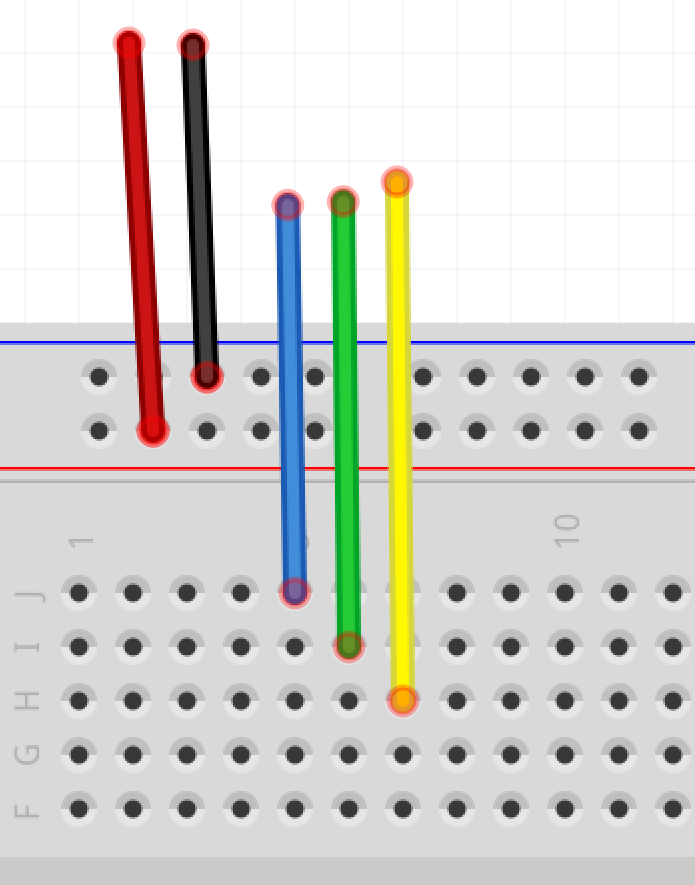
Wire up the breadboard for detecting photocell values.
Here we will need a couple of jumper wires, one photocell and 1kΩ resistor. We will firstly wireup the Red wire to pin Vin and the horizontal lines +. And similarly, the Black wire to pin Gnd and the horizontal line -. Next we will connect the photocell (or LDR) to pin A0 on the Spark Core and the ground, horizontal line -. LDRs do not have any polarity, so we can connect either of the legs to Gnd. Finally, with the 1kΩ resistor, we will connect to pins A0 and Vin on the Spark Core. This circuit might remind you of your high school physics voltage divider circuit.

Flash the firmware code to read the photocell values
While you see the breathing cyan on the Spark Core, take the LDR firmware code and flash it onto the Spark Core with the web ide. The firmware code does a couple of things. Every 200ms, it take the analog reading from pin A0, to which we connected the LDR and then publishes it as a Variable on the Spark Cloud which can then be queried using standard Web APIs. For easy detection and debugging we are also turning on and off the on-board LED D7 to indicate our code is running.
Install the npm module spark
$ npm install spark
Use JavaScript to query the sensor values.
Here’s now the fun part and we will query the sensor values using the simple spark code in a file ldr.js
var spark = require('spark');

spark.login({
	username: process.env.EMAIL,
	password: process.env.PASSWORD
}).then(
	function(token) {
		// Your program can successfully connect
		// to the published data from the sensor
		console.log('Connected to your light sensor successfully!');
		// console.log('Access Token: ' + token.access_token);
		spark.listDevices().then(
			function(devices){
				// console.log('\nDevices: ', devices);
				var device = devices[0];
				// With every published event getLight,
				// display the sensor value
				device.onEvent('getLight', function(reply) {
					var now = new Date();
					if (reply && reply.data) {
						// Some fun derivations based on the sensor value
						if (parseInt(reply.data) < 1000) {
							// Shine a torch light on the LDR
							// amend 1000 according to your environment
							console.log(
								now.getSeconds() + ': ' +
								reply.data + ' bright!'
							);
						} else if (parseInt(reply.data) > 2000) {
							// Cover the LDR amend 2000
							// according to your environment
							console.log(
								now.getSeconds() + ': ' +
								reply.data + ' dark! '
							);
						} else {
							console.log(
								now.getSeconds() + ': ' +
								reply.data
							);
						}
					}
				});
			},
			function(err) {
				console.log('List devices call failed: ', err);
			}
		);
	}, function(err) {
		console.log('Ooops error: ' + err);
	}
);
Let’s run this code from the command line using your Spark account’s email and password:
$ EMAIL="{SPARK_EMAIL_ADDRESS}" PASSWORD="{SPARK_ACCOUNT_PASSWORD}" node ldr.js
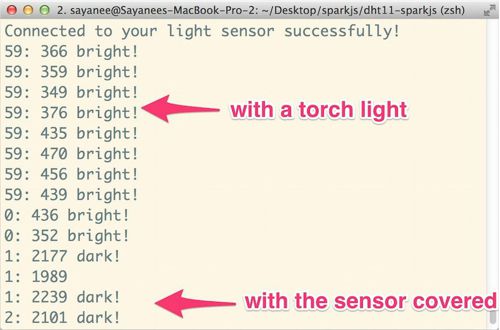
You should next see a stream of sensor data. Shine a torch light on the LDR and the value should change and a comment would be displayed. Cover the LDR totally and you will see another comment! So now whatever you do physically in the real world can be sensed with node and JavaScript! Such sensors can be used to sense open/close cupboard doors and light levels in rooms.
This is just the start in playing with the Spark JavaScript API for the server-side. There are many more firmware code libraries available that you can instantly flash to your SparkCore and collect the results via the events api.
3. Control a Servo
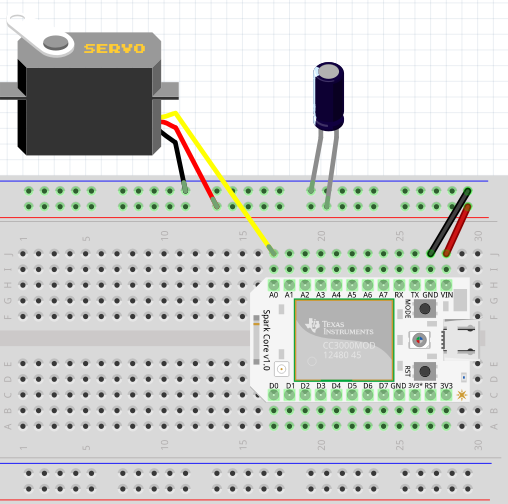
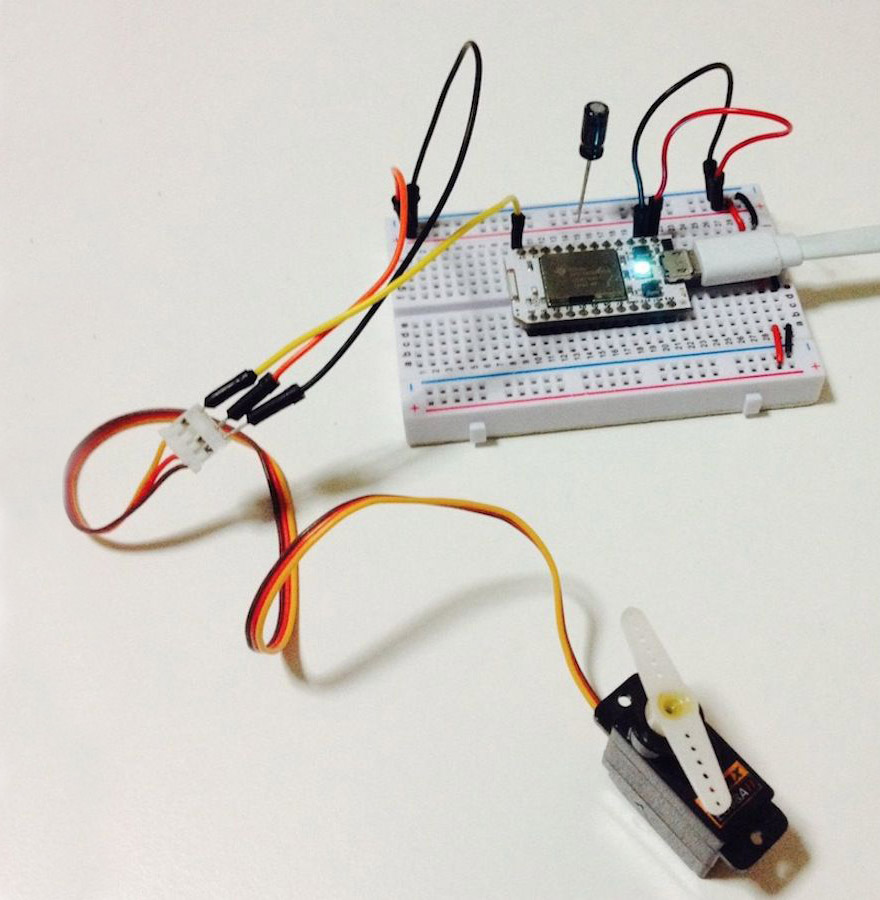
Let’s wire up the breadboard with a servo this time!
We will use a servo motor and a capacitor. Wire up the Black / Brown wire to the Gnd pin of the Spark Core, Orange / Red to the Vin of the Spark Core and finally the Yellow wire will be used to wire up to the analog pin A0 of the Spark Core. We will also use a capacitor between the Vin of the Spark Core and Gnd of the Spark Core to stabilize the power to the servo. Capacitor is optional, but it’s good to have it for stability.
The control of the servo is fairly easy. It can rotate 180 degrees. So, when the signal is 0V, it will rotate to 0 degrees and at the other end, when the signal is 5V it will rotate to 180 degrees. To help us do the analog output of these signals, we will use a firmware called VoodooSpark.
Flash the pre-built firmware Voodoospark using the Spark web editor and wait for the breathing cyan light
VoodooSpark will allow a local TCP connection instead of the usual HTTP protocol that we used in the earlier example. This allows controlling the Spark Core in real-time. Finally, we will use Express to create the routes that will trigger the rotation of the servo through an html page.
Use JavaScript to send signals to the servo via a web browser
$ npm install express johnny-five spark-io
We will need 3 modules. Spark-io to output the TCP packets which VooDooSpark firmware on the Spark Core understands. Johnny-Five package uses Spark-io and provides higher level interfaces to many devices such as sensors, motors, switches, etc. And finally Express to serve a webpage and pass HTTP requests from the browser to the Spark Core.
Store the Spark device id and access token in config file.
Create file ~/.sparkrc to store your config and add the file to your profile with source ~/.sparkrc:
export SPARK_TOKEN="{SPARK_ACCESS_TOKEN}"
export SPARK_DEVICE_ID="{SPARK_DEVICE_ID}"
Create the JavaScript code in file servo.js.
var express = require('express')
var five = require('johnny-five');
var Spark = require('spark-io');
var app = express();
var servo;

// Connect to the Spark Core with the authentication info
var board = new five.Board({
	io: new Spark({
		token: process.env.SPARK_TOKEN,
		deviceId: process.env.SPARK_DEVICE_ID
	})
});

// Use analog pin A0
board.on('ready', function() {
	servo = new five.Servo({
		pin: 'A0'
	});
	console.log('Servo is ready!');

});

app.use(express.static(__dirname));

// Move to servo to a certain degree
// github.com/rwaldron/johnny-five/blob/master/lib/servo.js#L241-251
app.get('/rotate/:deg', function (req, res) {
	if (servo) {
		servo.to(parseInt(req.params.deg))
		console.log('Rotate ' + req.params.deg + 'deg');
	}
})

var server = app.listen(3000, function () {
	console.log(
		'Control the servo at http://localhost:' + server.address().port
	);
})
Finally we will create the super simple html page index.html which will call the routes for the different angles.
<a href="/rotate/10">10 deg</a>
<a href="/rotate/170">170 deg</a>
Run the code with the node server and click the angles to make the servo move in the physical world!
$ node servo.js
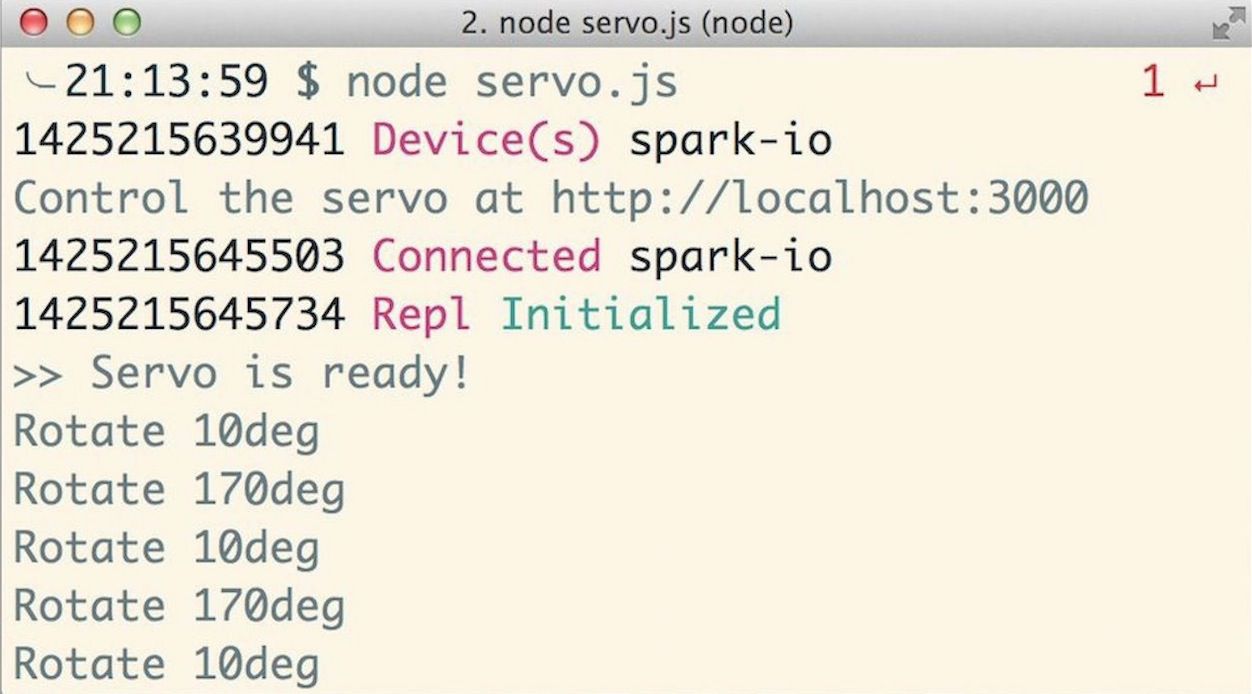
This example is just the tip of the iceberg in how you can control many other devices such as motors and switch with the web interface. I find the Johnny-Five library files very useful to peek into many more things we can hook up and play with!
TI Sensor Tag and BLE
In this section, we will use the Bluetooth Low Energy (BLE) protocol with the TI SensorTag, which is designed for developers to play with various sensors and BLE. The SensorTag comes with a BLE chip on-board along with sensors such as IR temperature sensor, humidity sensor, pressure sensor, accelerometer, etc in a compact handy device. The advantage of using BLE is its low power consumption. The SensorTag can be powered with just a coin cell potentially for years.
To play with the TI SensorTag, you need a couple of things:
- TI SensorTag powered with a single coin cell
- The machine on which you will run the JavaScript code should have BLE hardware.
The main npm module that we will be using to interface with the SensorTag is senstortag which is based on an underlying generic node BLE central module, noble. We will attempt to read the IR temperature from the SensorTag and log the gyroscope data while rotating the sensortag. Let’s get started by requiring the modules and connecting to the sensortag.
Create a file sensortag.js, connect, discover and then disconnect the device:
var async = require('async');
var SensorTag = require('sensortag');

SensorTag.discover(function(sensorTag) {

	sensorTag.on('disconnect', function() {
		console.log('Disconnected!');
		process.exit(0);
	});

	async.series([
		function(callback) {
			console.log('Connect!');
			sensorTag.connect(callback);
		},
		function(callback) {
			console.log('Discovered');
			sensorTag.discoverServicesAndCharacteristics(callback);
		},
		function(callback) {
			console.log('Disconnected');
			sensorTag.disconnect(callback);
		}
	]);

});
Because the events connect, discovered and disconnected should happen sequentially when the previous event is done, we will use the npm module async to deal with callbacks.
Read the IR Temperature once between the events discovered and disconnected:
function(callback) {
	console.log('IR Temperature enabled');
	sensorTag.enableIrTemperature(callback);
},

function(callback) {
	console.log('readIrTemperature');
	sensorTag.readIrTemperature(
		function(objectTemperature, ambientTemperature) {
			console.log(
				'\tobject temperature = %d °C',
				objectTemperature.toFixed(1)
			);
			console.log(
				'\tambient temperature = %d °C',
				ambientTemperature.toFixed(1)
			);
			callback();
		}
	);
},
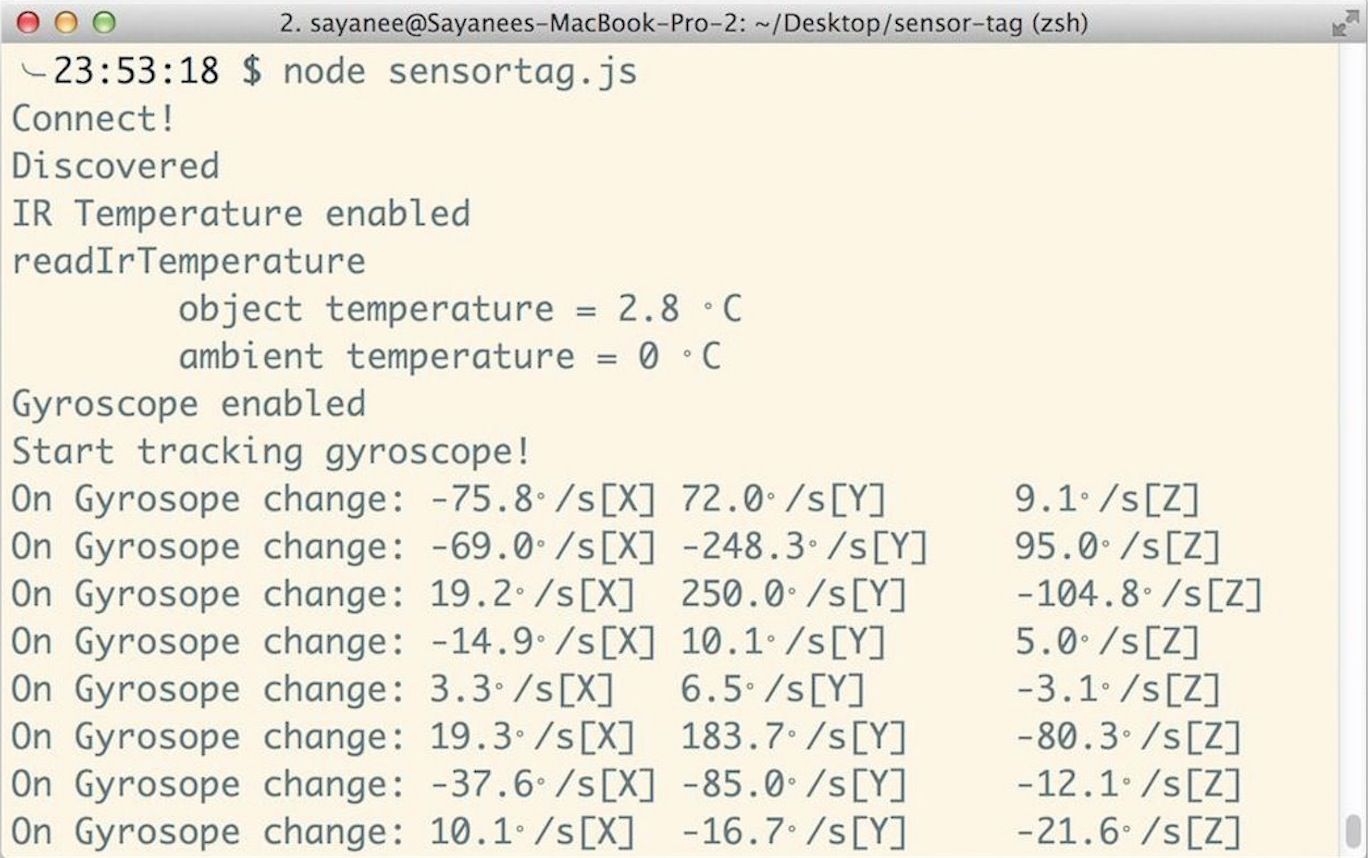
Finally, we will add in the gyroscope reading and when the SensorTag is physically rotated, the JavaScript should output the updated values from the gyroscope. We hook onto the gyroscope events after the IR temperature reading. We have to specifically enable the gyroscope readings using the notifyGyroscope API.
// readIRTemperature
function(callback) {
	console.log('Gyroscope enabled');
	sensorTag.enableGyroscope(callback);
},

function(callback) {
	setTimeout(callback, 1000);
},

function(callback) {
	sensorTag.on('gyroscopeChange', function(x, y, z) {
		console.log('On Gyrosope change: '
			+ x.toFixed(1) + '°/s[X]\t'
			+ y.toFixed(1) + '°/s[Y]\t'
			+ z.toFixed(1) + '°/s[Z]');
	});

	sensorTag.notifyGyroscope(function() {
		console.log('Start tracking gyroscope!');
	});
}

// Comment out disconnect
// function(callback) {
// 	console.log('Disconnected');
// 	sensorTag.disconnect(callback);
// }
You can refer to the entire code here. Let’s run it!
$ node sensortag.js
That is just a tiny example on how to interface with a BLE device. To dabble more, have a look at all the sensors data you can query in the SensorTag as well as the underlying noble module. The author of both these modules, Sandeep Mistry has open sourced many more BLE related npm packages such as the ones we can interface with iBeacons or Arduino library. Have a go at them!
More resources
The easiest way to start learning to interface web technologies with electronics is to choose a hardware platform which already comes with a JavaScript API. Here are some examples of more such platforms other than the Spark and SensorTag that we covered:
- Tessel — hardware api
- Arduino Yun — Johnny-Five
- Raspberry PI — node.js build for Linux arm pi, io.js builds for armv6l and armv7l
Hardware and electronics interfacing might be daunting at first, but the good news is there are many community events, forums, blog posts and modules/libraries available online. Here are some to check out:
- Nodebots — JavaScript based robotics events around the world
- Nodecopter — Node and drones community hacking events
- CyclonJS — JavaScript framework for robotics
- Serial port — Along with Wi-Fi and BLE, try out interfacing with the Z-Wave and Zigbee
- USB — communicate with USB devices

I hope this article gave you not only the initial steps for getting started, but plenty of resource to hack on your own or even get involved with the community! It might be challenging at start, but seeing your code literally come to life in the physical world will be immensely rewarding.
Come and hack away with electronics and JavaScript!
