Internationalization
Introduction
In this tutorial, we’ll see how internationalization, or i18n in short, can be achieved in opera extensions.
The basic principles
You can support multiple locales in Opera extensions. The first thing to do is to create a directory called _locales. Under this directory you create a subdirectory for each locale you need. For example, if you want your extensions to support American English, British English as well as Spanish, you will create _locales/en_US, _locales/en_GB and _locales/es.
In each of each of these subdirectories, you will need to create a file called messages.json, which will store the list of translated text strings needed.
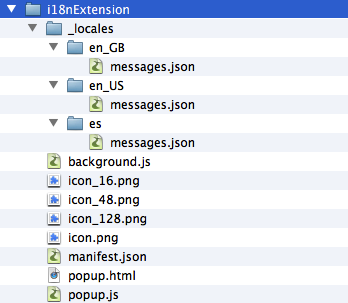
Above you can see how the file structure of an opera extension with i18n support will look like.
The way in which the browser will search and apply a translation is based on the following steps:
- Search for the exact dialect: If the user’s system locale is set to a dialect of a language (Like “American English” — which is
en_US) then it will see whether the translation of that message exists in themessages.jsonfile in theen_USfolder. If no such message exists, or the file or folder does not exist itself, then it will go to the next step. - Search for the language: If the message translation in the exact dialect cannot be found (In our case,
en_US), then it will try to look for amessages.jsonfile in theenfolder, if it exists. If it manages to find a translation in themessages.jsonfile in theenfolder, it will use it. However, if it cannot find it (whether its because there is no such translation inmessage.json, or if the file or folder does not exist), it will go to the next step. - Use the default locale: If the translation in neither the dialect nor the general language can be found (for example, the translation cannot be found in either
_locales/en_US/messages.jsonnor_locales/en/messages.json), then it will use the translation as provided in default locale (for example, if the default locale is set toes, then it would end up using the message in_locales/es/messages.json).
Translating Text: Manifest and CSS Files
You will need a translated version of the text in many different parts of the extension: the manifest file, the CSS files, and various JavaScript files. When it comes to the manifest and CSS files, you can access various strings using the __MSG_<messagename>__ convention.
Let’s take an example. A normal manifest file (which is not internationalized) would look like the following:
{
	"name": "Hello World!",
	"description": "This is a sample description."
}
If we were to create add Spanish language support to it, then we would create a directory as _locales/es and have a file called messages.json in it, where we would list the translated text in the following way:
{
	"extensionName": {
		"message": "Hola Mundo!"
	},
	"extensionDescription":{
		"message": "Esta es una extensión de la muestra."
	}
}
Now, we are going to change the manifest.json file to add i18n support. It will now look like so:
{
	"name": "__MSG_extensionName__",
	"description": "__MSG_extensionDescription__",
	"default_locale": "en_US",
}
Here, __MSG_extensionName__ will refer to the extensionName field. If the user’s locale is set to Spanish, then it will display the Spanish text.
When writing CSS for your extensions, you can refer to various translated strings in the same way using the __MSG_<messagename>__ convention.
Predefined Messages
You also have access to some predefined messages which are helpful when writing CSS or JavaScript code. All predefined messages have a @@ at the beginning. An example of this is the @@extension_id keyword which gives the ID of the extension. Below is a list of all the predefined messages you have access to.
@@extension_id: Gives the ID of the extension.@@ui_locale: The current locale of the browser.@@bidi_dir: The direction of the text flow of the current locale. For languages such as English, Spanish, Hindi etc it would beltr(left to right) and for languages such as Japanese or Arabic it would bertl(right to left).@@bidi_reversed_dir: This is the opposite of@@bidi_dir. If the value of@@bidi_dirisltrthen the value of@@bidi_reversed_dirwill bertl, otherwise it would beltr.@@bidi_start_edge: If the value of@@bidi_dirisltr, then this value will beleft. If the value of@@bidi_dirisrtl, then it isright.@@bidi_end_edge: If the value of@@bidi_dirisltr, then this value will beright. If the value of@@bidi_dirisrtl, then it isleft.
Predefined messages are particularly helpful in CSS. For example, we can write the following in our CSS file:
body {
	direction: __MSG_@@bidi_dir__;
}
header {
	float: __MSG_@@bidi_start_edge__;
	padding-__MSG_@@bidi_end_edge: 25px;
}
If the current locale is a ltr language like English, then the CSS will effectively be:
body {
	direction: ltr;
}
header {
	float: left;
	padding-right: 25px;
}
In case the current locale is a rtl language like Arabic, then the CSS will effectively be:
body {
	direction: rtl;
}
header {
	float: right;
	padding-left: 25px;
}
The i18n API
To help you in internationalization, please take a look at the chrome.i18n.* methods — in particular, the function getMessage().
One of the most common use cases for this API would be to translate the text in the html files (like the popup files, the options files etc). An interesting way to do this is to mark up the text you want translated using a data-* attribute.
For example, let’s say we have an extension which has a popup. This popup has some text in it, which we would like to be translated in other languages too. We will have the text in the messages.json files like so:
The messages.json file in the _locales/en_GB folder
{
	"extTitle": {
		"message": "Sample i18n Extension"
	},
	"extDesc": {
		"message": "You are using the British English locale `en_GB`."
	}
}
The messages.json file in the _locales/en_US folder
{
	"extTitle": {
		"message": "Sample i18n Extension",
		"description": "Title of the extension"
	},
	"extDesc":{
		"message": "You are using the American English locale `en_US`."
	}
}
The messages.json file in the _locales/es folder
{
"extTitle":{
"message": "Extensión i18n Muestra",
},
"extDesc":{
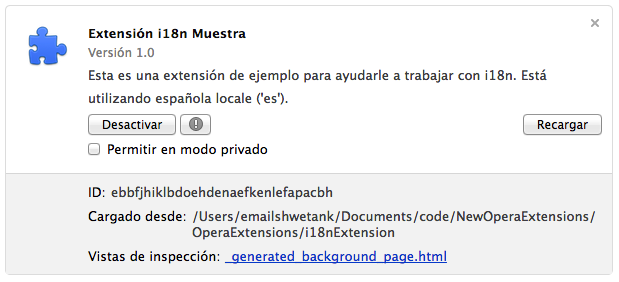
"message": "Está utilizando española locale `es`."
}
}
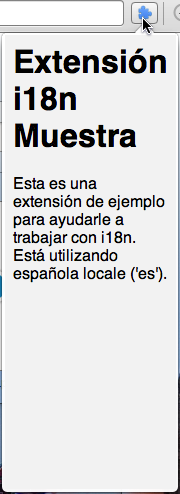
In our popup file, we would like the heading to be the title of the extension (which in our case is extTitle), and some text beneath (extDesc). We’ll markup the popup.html file like so:
<h1 data-translate="extTitle">
	Sample i18n Extension
</h1>
<p data-translate="extDesc">
	This is a sample extension to help you with i18n.
</p>
Here you can see that we have used a data-* attribute which we have named as data-translate. In our JavaScript code, we will loop over all elements, and detect if the element has a data-translate attribute associated with it. If so, we will take the value of it and find the corresponding message in the messages.json file using the function getMessage(). Let us see an example of it.
var elements = document.querySelectorAll('[data-translate]');
[].forEach.call(elements, function(element) {
	element.textContent = chrome.i18n.getMessage(element.dataset.translate);
});
This will ensure that when the locale is set to English, then the text in the popup will display in English, like so:

But when the locale is set to Spanish, then it will display Spanish text like so:
You can download a sample extension which uses i18n API and take a closer look.