An Introduction to WebGL — Part 1
Introduction
This is the first in our series of articles about WebGL. The objective of this series is to provide the information and resources you’ll need to get started learning WebGL. In this piece, we will discuss how WebGL works, what you need to create WebGL applications, and what a simple example looks like.
What is WebGL?
WebGL is a JavaScript API that allows us to implement interactive 3D graphics, straight in the browser. For an example of what WebGL can do, take a look at this WebGL demo video (viewable in all browsers!)
WebGL is a web standard developed by the Khronos group; Opera is an active participating member along with Google (Chrome), Mozilla (Firefox), Apple (Safari), and other 3D graphics developers.
WebGL runs as a specific context for the HTML <canvas> element, which gives you access to hardware-accelerated 3D rendering in JavaScript. Because it runs in the <canvas> element, WebGL also has full integration with all DOM interfaces. The API is based on OpenGL ES 2.0, which means that it is possible to run WebGL on many different devices, such as desktop computers, mobile phones and TVs. You can view the WebGL specification at the Khronos site.
How do I run WebGL?
To access WebGL content you need to have a browser that supports it.
- Opera 12.00 or above (enable webGL by entering Enable WebGL in opera:config by setting the value to 1, and Enable Hardware Acceleration similarly, then restart the browser)
- Chrome 9 or higher, on Linux, Mac and Windows
- Firefox 4 and higher
- Safari 5.1 or higher on Leopard, Snow Leopard, or Lion (make sure you enable WebGL in Safari — go to Preferences > Advanced and check “Show develop menu in menu bar”, then go to Develop > Enable WebGL)
Also, having a good graphics card will likely improve WebGL performance on your computer. If you don’t already have it, get the latest Opera release and check out the above video example running as a live demo. Another great demo to check out is Hello Racer.
What is WebGL used for?
WebGL allows developers to put real-time interactive 3D graphics in the browser. WebGL can be applied to interactive music videos, games, data visualization, art, 3D design environments, 3D modeling of space, 3D modeling of objects, plotting mathematical functions, or creating physical simulations.
How does WebGL work?
WebGL is slightly more complicated than your typical web technologies because it’s designed to work directly with your graphics card. As a consequence, it’s pretty low level. This is what allows it to rapidly do complex 3D rendering involving lots of calculations.
You don’t need to fully understand the inner workings of WebGL. There are several WebGL libraries available to take some of the complexity out of your hands. However, gaining an understanding of it can be useful in case you want to spice up your code with features that are not in your library of choice, or you feel that having a better grasp of the technology will help you find your way around what the libraries have to offer.
When programming in WebGL, you are usually aiming to render a scene of some kind. This usually includes multiple subsequent draw jobs or “calls”, each of which is carried out in the GPU through a process called the rendering pipeline.
In WebGL, like in most real-time 3D graphics, the triangle is the basic element with which models are drawn. Therefore, the process of drawing in WebGL involves using JavaScript to generate the information that specifies where and how these triangles will be created, and how they will look (colour, shades, textures, etc). This information is then fed to the GPU, which processes it, and returns a view of the scene. Next we will look in more detail at how this last bit happens.
The rendering pipeline
Note that this section is adapted from Joe Groff’s explanation of the graphics pipeline in OpenGL.
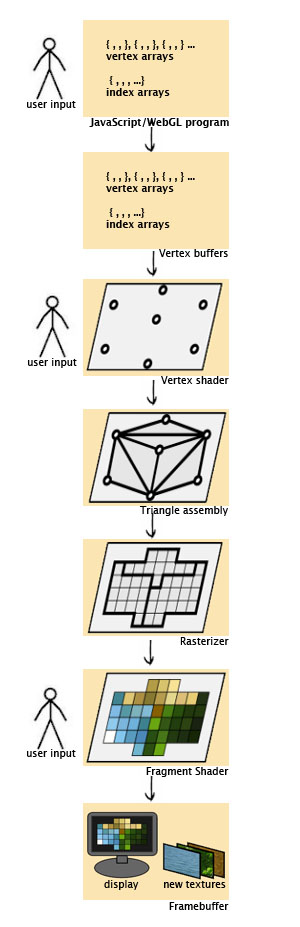
The process starts with the creation of the vertex arrays. These are arrays that contain vertex attributes like the location of the vertex in the 3D space and information about the vertex’ texture, colour or how it will be affected by lighting (vertex normal). These arrays and the information they contain are created in JavaScript in one or more of these ways: processing files that describe a 3D model (for example .obj files), procedurally creating the data from scratch, or using a library that provides vertex arrays for geometrical shapes.
Then the data in the vertex arrays is sent to the GPU by feeding it into a set of one or more vertex buffers. When a rendering job is submitted, we also have to supply an additional array of indices that point to the vertex array elements. They control how the vertices get assembled into triangles later on.
The GPU begins by reading each selected vertex out of the vertex buffer and running it through the vertex shader. The vertex shader is a program that takes a set of vertex attributes as inputs and outputs a new set of attributes. At a minimum, the vertex shader calculates the projected position of the vertex in screen space. But it can also generate other attributes such as colour or texture coordinates for each vertex. You can code your own vertex shader or use one provided by a WebGL library.
The GPU then connects the projected vertices to form triangles. It does this by taking the vertices in the order specified by the indices array and grouping them into sets of three.
The rasterizer takes each triangle, clips it, discards parts that are outside of the screen, and breaks the remaining visible parts into pixel-sized fragments. The vertex shader’s outputs for other vertex attributes are also interpolated across the rasterized surface of each triangle, assigning a smooth gradient of values to each fragment. For example, if the vertex shader assigns a colour value to each vertex, the rasterizer will blend those colours into an appropriate colour gradient across the pixelated surface.
The generated pixel-sized fragments then pass through another program called the fragment shader. The fragment shader outputs colour and depth values for each pixel, which then get drawn into the framebuffer. Common fragment shader operations include texture mapping and lighting. Since the fragment shader runs independently for every pixel drawn, it can perform the most sophisticated special effects; however, it is also the most performance-sensitive part of the graphics pipeline. As with the vertex shader, you can code your own fragment shader or use one provided by a WebGL library.
The framebuffer is the final destination for the rendering job’s output. A framebuffer is more than a single 2D image: in addition to one or more colour buffers, a framebuffer can have a depth buffer and/or stencil buffer, both of which optionally filter fragments before they are drawn to the framebuffer. Depth testing discards fragments from objects that are behind the ones already drawn, and stencil testing uses shapes drawn into the stencil buffer to constrain the drawable part of the framebuffer, “stencilling” the rendering job. Fragments that survive these two filters have their colour value alpha blended with the colour value they’re overwriting. Final colour, depth, and stencil values are drawn into the corresponding buffers. The buffers’ outputs can also be used as texture inputs to other rendering jobs.
How do I get started using WebGL?
The first thing you have to do is get a browser that supports WebGL. You can code WebGL using your favourite JavaScript development environment.
For your first WebGL project, I’d suggest using a WebGL library. If you have read the previous section you can probably imagine why directly using the WebGL API can be a bit exhausting. Unlike other web APIs, “naked” WebGL can be pretty low level. The people who designed WebGL decided to make it that way to keep it flexible and applicable to any use case, with the idea that libraries would later add a layer of convenience to accelerate and simplify development.
Most libraries provide a selection of ready-made models, vertex shaders and fragment shaders that can drastically decrease the amount of code you need to write. If you are still not convinced, have a look at the code for an example 3D model of the Moon — with a library and without a library. Even if you just take a quick look, the difference in length and complexity of code is apparent and makes a good case for using a library.
There are many WebGL libraries. What most do is build on top of WebGL to create elements intuitive to a 3D environment like a scene, a camera, a light source, ambient light, ready-made shapes, materials, textures, and effects such as fog, and floating particles. The idea of these elements remains pretty much the same across libraries. How they are used, however, depends on the library’s architecture. Because WebGL can be interactive, most libraries provide easy ways to handle events as well. Finally, most libraries also provide some vertex and fragment shaders. When you do your own library exploration you’ll see that this is by no means an exhaustive description of what libraries have to offer, but it gives you a good idea to start with.
Choose a WebGL library!
(Not a comprehensive list)
- Three.js (Github) is a lightweight 3D engine with a very low level of complexity — in a good way. The engine can render using
<canvas>,<svg>and WebGL. This is some info on how to get started, which has a nice description of the elements in a scene. And here is the Three.js API documentation. Three.js is also the most popular WebGL library in terms of number of users, so you can count on an enthusiastic community (#three.js on irc.freenode.net) to help you out if you get stuck with something. - PhiloGL (Github) is built with a focus on JavaScript good practices and idioms. Its modules cover a number of categories from program and shader management to XHR, JSONP, effects, web workers and much more. There is an extensive set of PhiloGL lessons that you can go through to get started. And the PhiloGL documentation is pretty thorough too.
- GLGE (Github) has some more complex features, like skeletal animation and animated materials. You can find a list of GLGE features on their project website. And here is a link to the GLGE API documentation.
- J3D (Github) allows you not only to create your own scenes but also to export scenes from Unity to WebGL. The J3D “Hello cube” tutorial can help you get started. Also have a look at this tutorial on how to export from Unity to J3D.
As mentioned, you can also write your own WebGL from scratch, using no libraries. Find out how at the Learning WebGL blog.
Looking at WebGL code
Now it’s time to have a look at some actual WebGL code. To make it simpler, this code has been created using a WebGL library. For the following example I have chosen PhiloGL because it has very good documentation, making it a great library for someone who wants to get started with WebGL.
This code shows some of the basic WebGL features that you may want to include in a simple program. The accompanying notes provide ample explanation, and links to the PhiloGL documentation for further details. You should take this example and experiment, making changes to what’s there already and maybe even adding a few things of your own design. If you’re curious you can compare this PhiloGL implementation with its equivalent in “raw” WebGL.
This scene has been translated into PhiloGL from Learning WebGL lesson #11. It shows a 3D model of the Moon, with textures applied from a NASA Moon map. The Moon can be rotated using drag-and-drop. You can see the moon example running live.
The next code snippet shows what your HTML file should look like. We import the PhiloGL script, as downloaded from the PhiloGL website, and the index.js file where we will write our code. We also create a <canvas> element where we want the WebGL scene to be rendered. When the document is loaded, webGLStart(); will be called. This function resides in index.js and will initialize the WebGL application.
<!DOCTYPE html>
<html>
<head>
	<title>Learning WebGL lesson 11 in PhiloGL</title>
	<link href="path/to/file.css" type="text/css" rel="stylesheet" media="screen">
	<script src="path/to/PhiloGL.js"></script>
	<script src="path/to/index.js"></script>
</head>
<body onload="webGLStart()">
	<canvas id="lesson11-canvas" width="500" height="500"></canvas>
	<!-- More HTML elements here… -->
</body>
</html>
Now Let’s walkthrough the code inside index.js. The webGLStart(); function is the entry point for creating the WebGL application.
function webGLStart() {
	var pos, $ = function(d) { return document.getElementById(d); };
The moon is created using the PhiloGL O3D module. O3D provides model management and 3D primitives, like the sphere used in this case. The number of parallels (nlat) and meridians (nlong) and the radius are specified. A texture is applied to the sphere from an image file:
//Create moon
var moon = new PhiloGL.O3D.Sphere({
	nlat: 30,
	nlong: 30,
	radius: 2,
	textures: 'moon.gif'
});
Next, the WebGL application is created by calling the PhiloGL constructor. The PhiloGL constructor automatically creates a WebGL context, a program, a camera, a scene, options for loading textures via IO, events handlers, and more. In this example we are going to use the default shaders, so no program needs to be specified in the constructor. The scene is also left unspecified. It will be created with its default values. The camera’s position is modified. We declare a texture from an image source (moon.gif), and use some event handlers: drag-and-drop to rotate, and the mouse scroll to zoom the model.
//Create application
PhiloGL('lesson11-canvas', {
	camera: {
		position: {
		x: 0, y: 0, z: -7
		}
	},
	textures: {
		src: ['moon.gif'],
		parameters: [{
			name: 'TEXTURE_MAG_FILTER',
			value: 'LINEAR'
		}, {
			name: 'TEXTURE_MIN_FILTER',
			value: 'LINEAR_MIPMAP_NEAREST',
			generateMipmap: true
		}]
	},
events: {
	onDragStart: function(e) {
		pos = {
			x: e.x,
			y: e.y
		};
	},
	onDragMove: function(e) {
		var z = this.camera.position.z,
		sign = Math.abs(z) / z;

		moon.rotation.y += -(pos.x - e.x) / 100;
		moon.rotation.x += sign * (pos.y - e.y) / 100;
		moon.update();
		pos.x = e.x;
		pos.y = e.y;
	},
	onMouseWheel: function(e) {
		e.stop();
		var camera = this.camera;
		camera.position.z += e.wheel;
		camera.update();
	}
},
Once the application is created successfully (the WebGL program is compiled, images are loaded and converted to textures, etc.), the onLoad callback will be executed. The first argument to the onLoad callback is a WebGL application. The WebGL Application class has useful methods to manipulate the program, the camera, the scene, etc. We also get a handle to the WebGL context through the gl property, in case we want to do some fine tuning at the WebGL API level:
onError: function() {
	alert('There was an error creating the app');
},
onLoad: function(app) {
	// Unpack app properties
	var gl = app.gl,
	program = app.program,
	scene = app.scene,
	canvas = app.canvas,
	camera = app.camera;
In this example, users can dynamically modify the lighting values (ambient light colour, point light colour, and position) using a form on the page. Here we get a handle to those form elements:
// Get light config from forms
lighting = $('lighting'),
ambient = {
	r: $('ambientR'),
	g: $('ambientG'),
	b: $('ambientB')
},
direction = {
	x: $('lightDirectionX'),
	y: $('lightDirectionY'),
	z: $('lightDirectionZ'),

	r: $('directionalR'),
	g: $('directionalG'),
	b: $('directionalB')
};
Next we define some basic WebGL setup information: we set opaque black for background colour when clearing the canvas, we enable depth testing (this hides objects that are “behind” other objects in the scene), and we set the viewport to occupy the total width and height of the canvas.
	// Basic gl setup
	gl.clearColor(0.0, 0.0, 0.0, 1.0);
	gl.clearDepth(1.0);
	gl.enable(gl.DEPTH_TEST);
	gl.depthFunc(gl.LEQUAL);
	gl.viewport(0, 0, canvas.width, canvas.height);
Now we add the moon to our scene, and draw it. For each frame in the scene, the draw() function clears the screen, sets up the lighting, renders the moon and makes a request for the next frame to be drawn:
// Add object to the scene
scene.add(moon);

// Draw the scene
draw();

function draw() {
	// Clear the screen
	gl.clear(gl.COLOR_BUFFER_BIT | gl.DEPTH_BUFFER_BIT);
	// Setup lighting
	var lights = scene.config.lights;
	lights.enable = lighting.checked;
	lights.ambient = {
		r: +ambient.r.value,
		g: +ambient.g.value,
		b: +ambient.b.value
	};
	lights.directional = {
		color: {
			r: +direction.r.value,
			g: +direction.g.value,
			b: +direction.b.value
		},
		direction: {
			x: +direction.x.value,
			y: +direction.y.value,
			z: +direction.z.value
		}
	};

	// Render moon
	scene.render();
	// Animate
	Fx.requestAnimationFrame(draw);
}
Summary
I hope this article gave you a good idea of what WebGL is about and how to get started building a simple WebGL application. Most importantly, however, I hope it got you excited about trying it yourself. We expect to publish more about WebGL in the near future. Stay tuned!
Useful links for more information:
- The Khronos WebGL forum
- Frequently asked questions about WebGL
- The Learning WebGL blog, a cool place for WebGL news and resources
Read part 2 of this series: An Introduction to WebGL — Part 2: Porting 3D Graphics.