Creating Pseudo 3D Games With HTML 5 Canvas and Raycasting — Part 1
Next article: Creating Pseudo 3D Games with HTML 5 Canvas and Raycasting — Part 2
Introduction
With the increase in browser performance in recent times it has become easier to implement games in JavaScript beyond simple games like Tic-Tac-Toe. We no longer need to use Flash to do cool effects and, with the advent of the HTML5 Canvas element, creating snazzy looking web games and dynamic graphics is easier than ever before. One game, or game engine, I wanted to implement for some time was a psuedo-3D engine such as the one used in the old Wolfenstein 3D game by iD Software. I went through two different approaches, first attempting to create a “regular” 3D engine using Canvas and later going for a raycasting approach using straight DOM techniques.
In this article, I’ll deconstruct the latter project and go through the details of how to create your own pseudo-3D raycasting engine. I say pseudo-3D because what we’re essentially creating is a 2D map / maze game that we can make appear 3D by as long as we restrict how the player is able to view the world. For instance we cannot allow the “camera” to rotate around other axes than the vertical axis. This ensures that any vertical line in the game world will also be rendered as a vertical line on the screen, a necessity since we’re in the rectangular world of DHTML. We will also not allow the player to jump or crouch, although this could be implemented without too much trouble. I won’t go too deep into the theoretical side of raycasting, even if it is a relatively simple concept. I’ll instead refer you to an excellent raycasting tutorial by F. Permadi, which explains it in much greater detail than is possible here.
The article assumes a decent level of experience with JavaScript, familiarity with the HTML5 <canvas> element and at least a basic understanding of trigonometry. Some things are best explained through the code examples you’ll find throughout the article, but be aware that these snippets do not cover everything. Download the full (commented) code to get all the details.
First steps
As mentioned, the basis of the engine will be a 2D map, so for now we’ll forget about the third dimension and focus on creating a 2D maze that we can walk around. The <canvas> element will be used to draw a topdown view of the world, which will function as a minimap of sorts. The actual “game” will involve manipulating regular DOM elements. This means that all major browsers will be supported out of the box (ie. Firefox 2+, Opera 9+, Safari 3, IE7). The <canvas> element is currently supported by Firefox, Opera and Safari but not Internet Explorer. Fortunately, we can get around that by using the ExCanvas project, a small JavaScript file that simulates some <canvas> functionality using VML.
The map
The first thing we need is a map format. One easy way to store this data is in an array of arrays. Each element in the nested arrays will be an integer corresponding to a block (2), wall (1) (basically, a number of more than 0 points to a wall/obstacle of some kind) or open space (0) type. The wall type will be used later to determine which texture to render.
// a 32x24 block map
var map = [
	[1,1,1,1,1,1,1,1,1,1,1,1,1,1,1,1,1,1,1,1,1,1,1,1,1,1,1,1,1,1,1,1],
	[1,0,0,0,0,0,0,0,0,0,0,0,0,0,0,0,0,0,0,0,0,0,0,0,0,0,0,0,0,0,0,1],
	[1,0,0,2,0,0,0,0,2,2,2,2,2,2,2,2,2,0,0,0,0,0,0,0,0,0,0,0,0,0,0,1],
	[1,0,0,2,0,0,0,0,2,2,2,2,2,2,2,2,2,0,0,0,0,0,0,0,0,0,0,0,0,0,0,1],
	[1,0,0,2,0,0,0,0,0,0,0,0,0,0,0,0,0,0,0,0,0,0,0,0,0,0,0,0,0,0,0,1],
	…
	[1,0,0,0,0,0,0,0,0,0,0,0,0,0,0,0,0,0,0,0,0,0,0,0,0,0,0,0,0,0,0,1],
	[1,1,1,1,1,1,1,1,1,1,1,1,1,1,1,1,1,1,1,1,1,1,1,1,1,1,1,1,1,1,1,1]
];
The basic map looks like Figure 1.
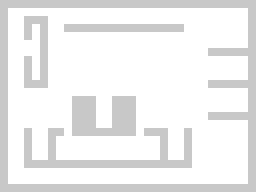
This way we can iterate through the map by looping through each nested array, and any time we need to access the wall type for a given block, we can get to it through a simple map[y][x] lookup.
Next, we’ll set up an initialization function which we’ll use to setup and start the game. For starters, it will grab a hold of the minimap <canvas> element and loop through the map data, drawing colored squares whenever it encounters a solid wall block. This will create a topdown view of the level like the one seen in Figure 1. Click the link below the image to see the minimap in (non-)action.
var mapWidth = 0;		// Number of map blocks in x-direction
var mapHeight = 0;		// Number of map blocks in y-direction
var miniMapScale = 8;	// How many pixels to draw a map block

function init() {
	mapWidth = map[0].length;
	mapHeight = map.length;

	drawMiniMap();
}

function drawMiniMap() {
	// Draw the topdown view minimap
	var miniMap = $('minimap');
	// Resize the internal canvas dimensions
	miniMap.width = mapWidth * miniMapScale;
	miniMap.height = mapHeight * miniMapScale;
	// Resize the canvas CSS dimensions
	miniMap.style.width = (mapWidth * miniMapScale) + 'px';
	miniMap.style.height = (mapHeight * miniMapScale) + 'px';

	// Loop through all blocks on the map
	var ctx = miniMap.getContext('2d');
	for (var y=0; y < mapHeight; y++) {
		for (var x=0; x < mapWidth; x++) {
			var wall = map[y][x];
			// If there is a wall block at this (x,y)…
			if (wall > 0) {
				ctx.fillStyle = 'rgb(200,200,200)';
				// …Then draw a block on the minimap
				ctx.fillRect(
					x * miniMapScale,
					y * miniMapScale,
					miniMapScale, miniMapScale
				);
			}
		}
	}
}
Moving the player
Now we have the game rendering a top-down view of our world, but nothing much is happening since we don’t have a player character to move around yet. We’ll start by adding another function, gameCycle(). This function is called once; the initialization function will then call itself recursively to constantly update the game view. We add some player variables for storing the current (x,y) position within the game world, as well as the direction we’re facing, ie. the angle of rotation. Then we expand the game cycle to include a call to a move() function, which takes care of moving the player.
function gameCycle() {
	move();
	updateMiniMap();
	setTimeout(gameCycle,1000/30); // Aim for 30 FPS
}
We collect all our player related variables in a single player object. This makes it easier to expand the move function later on, to move other entities; this works well as long as these entities share the same “interface”, ie. have the same properties.
var player = {
	// Current x, y position of the player
	x : 16,
	y : 10,
	// The direction that the player is turning,
	// either -1 for left or 1 for right
	dir : 0,
	// The current angle of rotation
	rot : 0,
	// Is the playing moving forward (speed = 1)
	// or backwards (speed = -1).
	speed : 0,
	// How far (in map units) does
	// the player move each step/update
	moveSpeed : 0.18,
	// How much does the player rotate each
	// step/update (in radians)
	rotSpeed : 6 * Math.PI / 180
}

function move() {
	// Player will move this far along
	// the current direction vector
	var moveStep = player.speed * player.moveSpeed;

	// Add rotation if player is rotating (player.dir != 0)
	player.rot += player.dir * player.rotSpeed;

	// Calculate new player position with simple trigonometry
	var newX = player.x + Math.cos(player.rot) * moveStep;
	var newY = player.y + Math.sin(player.rot) * moveStep;

	// Set new position
	player.x = newX;
	player.y = newY;
}
As you can see, movement and rotation is based on whether or not the player.dir and player.speed variables are “turned on”, that is, they are not zero. To get the player to actually move, we need a couple of keybinds to set these variables. We’ll bind the up and down arrows to control movement speed and left/right to change the direction.
function init() {
	…
	bindKeys();
}

// Bind keyboard events to game functions (movement, etc)
function bindKeys() {
	document.onkeydown = function(e) {
		e = e || window.event;
		// Which key was pressed?
		switch (e.keyCode) {
			// Up, move player forward, ie. increase speed
			case 38:
				player.speed = 1; break;
			// Down, move player backward, set negative speed
			case 40:
				player.speed = -1; break;
			// Left, rotate player left
			case 37:
				player.dir = -1; break;
			// Right, rotate player right
			case 39:
				player.dir = 1; break;
		}
	}
	// Stop the player movement/rotation
	// when the keys are released
	document.onkeyup = function(e) {
		e = e || window.event;
		switch (e.keyCode) {
			case 38:
			case 40:
				player.speed = 0; break;
			case 37:
			case 39:
				player.dir = 0; break;
		}
	}
}
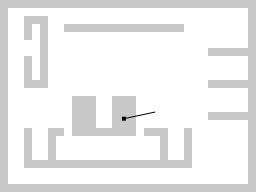
As seen in Figure 2 (check also the linked example), we now have the player moving around.
Ok, so far so good. The player can now move around the level, but there is one very obvious problem: the walls. We need to have some sort of collision detection to make sure the player can’t walk through the walls like a ghost. We’re going to settle for the simplest solution for now since proper collision detection could take an entire article just for itself. What we’ll do is to just check if the point we’re trying to move to is inside a wall block. If it is, then stop and don’t move any further, if not then let the player move.
function move() {
	…
	// Are we allowed to move to the new position?
	if (isBlocking(newX, newY)) {
		// No, bail out
		return;
	}
	…
}

function isBlocking(x,y) {
	// First make sure that we cannot move
	// outside the boundaries of the level
	if (y < 0 || y >= mapHeight || x < 0 || x >= mapWidth) {
		return true;
	}
	// Return true if the map block is not 0,
	// i.e. if there is a blocking wall.
	return (map[Math.floor(y)][Math.floor(x)] != 0);
}
As you can see, we not only check if the point is inside a wall but also if we’re trying to move outside the level. As long as we have a solid “frame” of walls surrounding the level, this shouldn’t ever be the case, but we’ll keep it just in case. Now try demo 3 with the new collision detection and try moving through the walls.
Casting rays
Now that we’ve got the player character safely moving about the world we can begin moving into the third dimension. To to do that, we’ll need to figure out what is visible in the player’s current field of vision; for that purpose we’ll be using a technique called raycasting. To understand this, imagine rays being shot or “cast” out from the viewer in all directions within their field of view. When the ray hits a block (by intersecting one of its walls), we know which block/wall on the map should be displayed in that direction.
If this doesn’t make much sense, I strongly suggest taking a break and reading Permadi’s excellent raycasting tutorial.
Consider a 320x240 game screen rendering a 120° Field of Vision (FOV). If we cast out a ray at every 2 pixels, we’ll be needing 160 rays, 80 rays on each side of the player’s direction. In this way, the screen is divided in vertical strips of 2 pixels width. For this demo we’ll be using a FOV of 60° and a resolution of 4 pixels per strip, but these numbers are easy to change.
At each game cycle, we loop through these strips, calculate the direction based on the player’s rotation and cast a ray to find the nearest wall to render. The angle of the ray is determined by calculating the angle of the line from the player to the point on the screen or view.
The tricky part here is of course the actual raycasting, but we can take advantage of the simple map format that we’re using. Since everything on the map is positioned on an evenly spaced grid of vertical and horizontal lines, all we need is a bit of basic maths to solve our problem. The simplest way to do this is to do two runs of testing, one where we test for ray collision against the “vertical” walls and then another one for the “horizontal” walls.
First we go through the vertical strips on the screen. The number of rays we need to cast equals the number of strips.
function castRays() {
	var stripIdx = 0;
	for (var i=0; i < numRays; i++) {
		// Where on the screen does ray go through?
		var rayScreenPos = (-numRays/2 + i) * stripWidth;

		// The distance from the viewer to the point
		// on the screen, simply Pythagoras.
		var rayViewDist = Math.sqrt(rayScreenPos*rayScreenPos + viewDist*viewDist);

		// The angle of the ray, relative to the viewing direction
		// Right triangle: a = sin(A) * c
		var rayAngle = Math.asin(rayScreenPos / rayViewDist);
		castSingleRay(
			// Add the players viewing direction
			// to get the angle in world space
			player.rot + rayAngle,
			stripIdx++
		);
	}
}
The castRays() function is called once per game cycle after the rest of the game logic. Next comes the actual ray casting as described above.
function castSingleRay(rayAngle) {
	// Make sure the angle is between 0 and 360 degrees
	rayAngle %= twoPI;
	if (rayAngle > 0) rayAngle += twoPI;

	// Moving right/left? up/down? Determined by
	// which quadrant the angle is in
	var right = (rayAngle > twoPI * 0.75 || rayAngle < twoPI * 0.25);
	var up = (rayAngle < 0 || rayAngle > Math.PI);

	var angleSin = Math.sin(rayAngle), angleCos = Math.cos(rayAngle);

	// The distance to the block we hit
	var dist = 0;
	// The x and y coord of where the ray hit the block
	var xHit = 0, yHit = 0;
	// The x-coord on the texture of the block,
	// i.e. what part of the texture are we going to render
	var textureX;
	// The (x,y) map coords of the block
	var wallX;
	var wallY;

	// First check against the vertical map/wall lines
	// we do this by moving to the right or left edge
	// of the block we’re standing in and then moving
	// in 1 map unit steps horizontally. The amount we have
	// to move vertically is determined by the slope of
	// the ray, which is simply defined as sin(angle) / cos(angle).

	// The slope of the straight line made by the ray
	var slope = angleSin / angleCos;
	// We move either 1 map unit to the left or right
	var dX = right ? 1 : -1;
	// How much to move up or down
	var dY = dX * slope;

	// Starting horizontal position, at one
	// of the edges of the current map block
	var x = right ? Math.ceil(player.x) : Math.floor(player.x);
	// Starting vertical position. We add the small horizontal
	// step we just made, multiplied by the slope
	var y = player.y + (x - player.x) * slope;

	while (x >= 0 && x < mapWidth && y >= 0 && y < mapHeight) {
		var wallX = Math.floor(x + (right ? 0 : -1));
		var wallY = Math.floor(y);

		// Is this point inside a wall block?
		if (map[wallY][wallX] > 0) {
			var distX = x - player.x;
			var distY = y - player.y;
			// The distance from the player to this point, squared
			dist = distX*distX + distY*distY;

			// Save the coordinates of the hit. We only really
			// use these to draw the rays on minimap
			xHit = x;
			yHit = y;
			break;
		}
		x += dX;
		y += dY;
	}

	// Horizontal run snipped,
	// basically the same as vertical run
	…

	if (dist)
	drawRay(xHit, yHit);
}
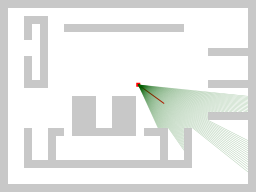
The test for the horizontal walls is almost identical to the vertical test, so I won’t go into detail about that part; I’ll just add that if a wall is found in both runs, we take the one with the shortest distance. At the end of the raycasting we draw the actual ray on the minimap. This is only temporary and for testing purposes. It takes a fair bit of CPU in some browsers, so we’ll remove the ray drawing once we start rendering the 3D view of the world. I won’t include the code for that here but you can find it in the sample code. The result so far looks something like Figure 3.
Textures
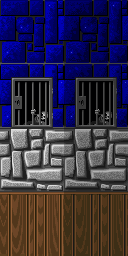
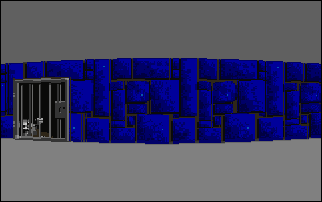
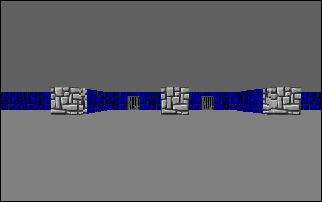
Before we go any further, let’s take a look at the textures we’ll be using. Since my previous projects were heavily inspired by Wolfenstein 3D, we’ll stick to that and use a small selection of wall textures from that game. Each wall texture is 64x64 pixels and with the wall type indices in the map arrays, it’s easy to locate the correct texture for a specific map block, ie if a map block has wall type 2 that means we should be looking at the part of the image that goes from 64px to 128px in the vertical direction. Later when we start stretching the texture to simulate distance and height, this gets a little more complicated but the principle stays the same. As you can see in Figure 4, there are two versions of each texture, a regular one and a slightly darker one. It’s relatively easy to fake a bit of shading by making all walls facing north or east use one set of textures and all walls facing south or west use the other set, but I’ll leave that as an exercise for the reader.
Opera and image interpolation
There’s a small gotcha in Opera with regards to the texture rendering. It appears Opera uses internal Windows GDI+ methods for rendering and scaling images, and for whatever reason this forces opaque images with more than 19 colors to be interpolated (using some bicubic or bilinear algorithm, I suppose). This can drastically slow down an engine such as this one, since it relies on constantly rescaling many images several times per second. Fortunately, this feature can be disabled in opera:config under “Multimedia” (uncheck “Show Animation”, then Save). Alternatively, you can either save your texture images with a palette of 20 colors or less, or create at least one transparent pixel somewhere in the texture. However, even with this latter approach, there still seems to be a slowdown compared to when interpolation is turned off completely. It can also drastically reduce the visual quality of the textures, so such a fix should probably be disabled for other browsers.
function initScreen() {
	…
	img.src = (window.opera ? 'walls-19-colors.png' : 'walls.png');
	…
}
Going 3D!
It may not look like much yet, but we’ve now got a solid base to render a pseudo-3D view from. Each ray corresponds to a vertical line on the “screen” and we know the distance to the wall we’re looking at in that direction. Now’s the time to put some wallpaper on those walls we just hit with our rays, but before we can do this, we need to set up our game screen. First we create a container div element with the correct dimensions.
<div id="screen"></div>
Then we create all the strips as children of this element. The strip elements are also div elements, created with a width equal to the strip width we decided on earlier and positioned at intervals so that together, they fill the entire screen. It is important that the strip elements have overflow set to hidden in order to hide the parts of the texture that don’t belong to this strip. As a child of each strip, we now add an image element containing the texture image. This is all done in a function that we call in the init() we created at the beginning of this article.
var screenStrips = [];

function initScreen() {
	var screen = $('screen');
	for (var i=0; i < screenWidth; i+=stripWidth) {
		var strip = dc('div');
		strip.style.position = 'absolute';
		strip.style.left = i + 'px';
		strip.style.width = stripWidth + 'px';
		strip.style.height = '0px';
		strip.style.overflow = 'hidden';

		var img = new Image();
		img.src = 'walls.png';
		img.style.position = 'absolute';
		img.style.left = '0px';

		strip.appendChild(img);
		// Assign the image to a property on the strip element
		// so we have easy access to the image later
		strip.img = img;

		screenStrips.push(strip);
		screen.appendChild(strip);
	}
}
Changing which wall texture is used for a specific strip is now a matter of moving its texture image up and down, and by moving it left/right while stretching it we can paint a specific part of the texture. To control the apparent distance to the wall we adjust the height of the strip element and stretch the texture image vertically to make the individual texture fit the new height. We keep our horizon at the center of the screen, so all that’s left is to move the strip element down to the center of the screen minus half its own height.
The strip elements and their child images are stored in an array so that we can easily access them by strip index later.
Let’s go back to the rendering loop now. In the raycasting loops we now need to remember a bit of extra information about the wall we hit, namely the specific spot on the wall that was hit and the type of wall. This is what determines how we’re going to move the texture image within the strip element to make sure the right part is visible. We now throw away the minimap raydrawing part from earlier and replace it with the code that is going to manipulate the screen strips.
We have already figured out the squared distance to the wall, so we take the square root of the saved “distance” to get the actual distance to the wall. While this is the real distance to the point on the wall that was hit by the ray, we need to adjust it a bit lest we get something commonly referred to as the “fish-eye” effect. This effect is best explained by seeing it (Figure 5).
Notice how the walls seem to be “bend”. Fortunately, the fix is easy — we simply need to get the distance perpendicular to the wall we hit. This is done by multiplying the distance to the wall by the cosine of the relative ray angle. See the “Finding distance to walls” page of Permadi’s tutorial for further details.
…
if (dist) {
	var strip = screenStrips[stripIdx];

	dist = Math.sqrt(dist);

	// Use perpendicular distance to adjust for fish eye
	// distorted_dist = correct_dist / cos(relative_angle_of_ray)
	dist = dist * Math.cos(player.rot - rayAngle);
Now we can calculate the projected wall height; since the wall blocks are cubes, the width of wall in this single strip is the same, although we must stretch the texture additionally by a factor equal to the strip width to make it render correctly. When we hit the wall in the raycasting loop, we also saved the type of wall, which tells us how far up we have to move the texture image. We basically multiply this number by the projected wall height and that’s it. Finally, as described earlier, we simply move the strip element and its image into place.
	// Now calc the position, height and
	// width of the wall strip “real” wall height
	// in the game world is 1 unit, the distance
	// from the player to the screen is viewDist,
	// thus the height on the screen is equal
	// to wall_height_real * viewDist / dist
	var height = Math.round(viewDist / dist);

	// Width is the same, but we have to stretch
	// the texture to a factor of stripWidth
	// to make it fill the strip correctly
	var width = height * stripWidth;

	// Top placement is easy since everything
	// is centered on the x-axis, so we simply move
	// it half way down the screen and then
	// half the wall height back up.
	var top = Math.round((screenHeight - height) / 2);

	strip.style.height = height + 'px';
	strip.style.top = top + 'px';

	strip.img.style.height = Math.floor(height * numTextures) + 'px';
	strip.img.style.width = Math.floor(width*2) +'px';
	strip.img.style.top = -Math.floor(height * (wallType-1)) + 'px';

	var texX = Math.round(textureX*width);

	// Make sure we don’t move the
	// texture too far to avoid gaps
	if (texX > width - stripWidth) {
		texX = width - stripWidth;
	}

	strip.img.style.left = -texX + 'px';
}
And that’s about it; see Figure 6 for the final result! Well, not really — there’s still plenty of things to do before this can be called a game but the first big hurdle is done with and there’s a 3D world ready to be expanded upon. The last thing needed is to add a floor and a ceiling but this part is trivial if we make both a solid color. Simply add two div elements, each taking up half the screen space. Position them underneath the strips using z-index as appropriate and colour them as needed.
Ideas for further development
- Separate the rendering from the rest of the game logic (movement, etc.) Movement and other things should be independent of the framerate.
- Optimizing — Several places can be optimized to gain small performance improvements, ie only set the style properties on the strips when they have actually changed and things like that.
- Static sprites — Adding the ability to render static sprites (like lamps, tables, pickups, etc) would make the 3D world much more interesting.
- Enemies/NPCs — When the engine is capable of rendering static sprites and it can move around at least one entity, we should also be able to combine these two with a simple AI to populate the world.
- Better movement handling and collision detection — The player movement is rather crude, ie. the player comes to a full stop as soon as you release the key. Using a bit of acceleration when dealing with both movement and rotation would make for a smoother experience. The current collision detection is a bit brutal; the player is simply stopped dead in their tracks. Being able to slide along walls would be a great improvement.
- Sounds — Using a Flash/JavaScript sound bridge such as Scott Schill’s SoundManager2 it would be easy to add sound effects to various events.
Next article: Creating Pseudo 3D Games with HTML 5 Canvas and Raycasting — Part 2