Synthesising Drum Sounds with the Web Audio API
The Web Audio API
The Web Audio API is a new way of working with audio on the web. It provides a way to playback pre-recorded audio, synthesise arbitrary new sounds and control the precise moment of sound generation accurately and reliably, irrespective of what else is happening in your application.
In this article, we’re going to learn more about the API by building a simple drum machine. We’ll learn just enough about the API to play a simple loop constructed from sounds we synthesise ourselves, and we’ll see how to use recordings of real-life sounds too. From these bare bones, you’ll be able to extend the machine yourself, or apply the techniques you’ve learnt to other applications. Let’s get started!
Sampling or synthesising?
Early on, we have a decision to make. Shall we synthesise the sounds of our drum kit from scratch in the computer, or shall we use a recording of real-life sounds — a technique also known as “sampling”? There are pros and cons to both approaches.
Synthesising, recreating the sound of a drum using a model of its acoustics and attempting to recreate that model in code, gives us infinite control, but it can be very difficult to accurately synthesise a realistic sounding drum. Sampling on the other hand means we can start with any sound we like, but we are limited to just that sound, perhaps with some simple transformations (playing the sound back faster or slower, or applying some effects, for example).
In this article we’ll try and create something that sounds a bit like the classic electronic drum machine, Roland’s TR-808. We’ll synthesise the kick and snare, and create a hi-hat sound from a recording of the original machine.
The kick
We’ll kick off with the basis of all good drum loops, the kick drum. To generate audio using the Web Audio API, your browser needs to know about the sound producing device available to your computer, and what capabilities it has. This information is contained in the AudioContext.
var context = new AudioContext;
console.log(context.sampleRate);
// → 44100
console.log(context.destination.channelCount);
// → 2
We can describe audio digitally as a series of numbers. Each number describes the amplitude of the sound at a particular point in time. We call each one of these numbers a “sample”. (“Sampling” gets its name from the process of turning a recording of a real sound into a series of samples.) Calling context.sampleRate tells us how many samples per second our device can produce. A typical sample rate is 44,100 samples/second, as this is sufficient to reproduce sounds at frequencies as high as we humans can perceive. context.destination.channelCount gives the number of simultaneous channels of audio our device can produce — on my computer that’s two: one for the left speaker, and one for the right.
It would be possible, but not very user-friendly, to create the sound we want to make by giving the computer 44,100 numbers per second, if we knew which numbers to give it to create the sound of a kick drum. But the Web Audio API makes the process easier by providing us with a higher level, declarative set of commands to describe to the computer how to make the sound we want.
var oscillator = context.createOscillator();
oscillator.frequency = 261.6;

oscillator.connect(context.destination);

oscillator.start(0);
If you type the code above into your developer console, you should hear a low-pitched, single frequency tone at 261.6 Hz (if you’re a musician, that’s a middle C).
Make it stop? OK.
oscillator.stop(0);
There’s a few things to note in the code above. Firstly createOscillator is a method on context — it needs to know about the audio environment it’s operating in to generate the sound. All of the applications you build with Web Audio will work within an AudioContext.
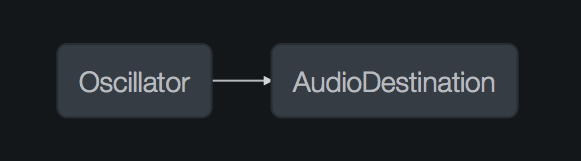
Secondly, we connect the oscillator to the destination of the context. This is an important concept within the Web Audio API. We call oscillator and destination instances of “nodes” and by connecting them together we create a graph. (This diagram was generated using the Web Audio developer tools in Firefox Developer Edition.)
Thirdly, calls to start and stop take the time as an argument. 0 means to perform the operation immediately, but we can supply any argument and it will be interpreted as the number of seconds from now. What time is now?
console.log(context.currentTime);
// → 1182.5980952380953
If you’ve worked with other timing mechanisms in JavaScript before, such as setTimeout, this concept of time may be slightly unfamiliar. Here, when we say start(0.5) the browser will attempt, as much as it can, to play the sound in half a second, and unlike setTimeout, will not interrupt this as much as practical. This is essential for our drum machine, as we want to schedule sounds precisely and with an exact rhythm.
Back to our kick drum. A lot of people have researched the acoustics of drums and how they make sound. I’ve included some further reading at the end of this article if you’re interested in this fascinating subject. For two-skinned drums, such as the kick drum, they’ve noticed that the sound starts at a higher frequency — the ‘attack’ phase when the striker hits the skin — and then rapidly falls away to a lower frequency. While this is happening, the volume of the sound also decreases. Once we’ve struck the drum there’s nothing to keep producing sound so it simply decays. Let’s tackle the latter part, the “envelope” of the sound, first.
var oscillator = context.createOscillator();
oscillator.frequency = 150;

var gain = context.createGain();

oscillator.connect(gain);
gain.connect(context.destination);

var now = context.currentTime;

gain.gain.setValueAtTime(1, now);
gain.gain.exponentialRampToValueAtTime(0.001, now + 0.5);
oscillator.start(now);
oscillator.stop(now + 0.5);
In the code above, we’ve created this audio graph:

A gain node is like a volume control. We can use that to control the amplitude of our oscillator over time. It has a parameter gain which we can automate. We do that by calling the functions setValueAtTime, which sets the gain to be 1 at time 0 and exponentialRampToValueAtTime which decreases the gain to close to zero over the next 0.5 seconds. Any parameter on any node in the Web Audio API can be automated in this way if it implements the AudioParam interface:
console.log(gain.gain);
// → AudioParam { defaultValue: 1, value: 1, setValueAtTime: function, linearRampToValueAtTime: function, exponentialRampToValueAtTime: function… }
Armed with this knowledge, we now know how to complete our kick drum synthesis: by dropping the frequency of the oscillator rapidly after the initial attack.
oscillator.frequency.setValueAtTime(150, now);
oscillator.frequency.exponentialRampToValueAtTime(0.001, now + 0.5);
If you’ve been following along with the code in this article, you may have noticed that once you call stop on an oscillator, it’s impossible to call start again. This is intentional — it allows the browser to garbage-collect the nodes more efficiently in large audio graphs — but it does make working with these drum sounds more complicated as we’d like a way to trigger them multiple times. We can solve this by wrapping the code we’ve written in a simple object:
function Kick(context) {
	this.context = context;
};

Kick.prototype.setup = function() {
	this.osc = this.context.createOscillator();
	this.gain = this.context.createGain();
	this.osc.connect(this.gain);
	this.gain.connect(this.context.destination)
};

Kick.prototype.trigger = function(time) {
	this.setup();

	this.osc.frequency.setValueAtTime(150, time);
	this.gain.gain.setValueAtTime(1, time);

	this.osc.frequency.exponentialRampToValueAtTime(0.01, time + 0.5);
	this.gain.gain.exponentialRampToValueAtTime(0.01, time + 0.5);

	this.osc.start(time);

	this.osc.stop(time + 0.5);
};
We store a reference to the audio context when we create the kick, and then each time we trigger the kick sound we can pass in a time, which creates the audio graph and schedules the parameter changes.
var kick = new Kick(context);
var now = context.currentTime;
kick.trigger(now);
kick.trigger(now + 0.5);
kick.trigger(now + 1);
The Snare Drum
A snare drum has a rigid shell holding two, taut drum membranes. When the top membrane is struck, a series of wire springs held underneath the lower membrane rattle in sympathy. There’s a complexity to the snare sound that makes it more challenging to synthesise. But we can tackle it in stages to make the process easier.
First, the rattle of the wire snare underneath the drum can be synthesised using a burst of noise. We can create noise using a random number generator.
function Snare(context) {
	this.context = context;
};

Snare.prototype.noiseBuffer = function() {
	var bufferSize = this.context.sampleRate;
	var buffer = this.context.createBuffer(1, bufferSize, this.context.sampleRate);
	var output = buffer.getChannelData(0);

	for (var i = 0; i < bufferSize; i++) {
		output[i] = Math.random() * 2 - 1;
	}

	return buffer;
};
In this code we create a “buffer” of individual samples, which we can later trigger at a precise time. The call to createBuffer specifies that the buffer has a single channel, 44100 individual samples, at a sample rate of 44100 Hz. That is, 1 second of audio in total. This should be sufficient for our purposes since the sound of an individual snare hit is very short.
We fill the buffer with random numbers between -1 and 1. This even distribution of random numbers creates “white” noise, which is noise with equal energy at every frequency. Removing some of the lowest frequency sound from this noise creates a more realistic sounding snare. We can do that using a filter:
Snare.prototype.setup = function() {
	this.noise = this.context.createBufferSource();
	this.noise.buffer = this.noiseBuffer();
	var noiseFilter = this.context.createBiquadFilter();
	noiseFilter.type = 'highpass';
	noiseFilter.frequency.value = 1000;
	this.noise.connect(noiseFilter);
	// …
};
We set the cutoff frequency of the filter at 1000 Hz. This means noise below 1000 Hz will be removed. We also need to shape the amplitude of the noise burst using an envelope, as we did before with the snare drum.
// …
this.noiseEnvelope = this.context.createGain();
noiseFilter.connect(this.noiseEnvelope);

this.noiseEnvelope.connect(this.context.destination);
// …
A short burst of filtered noise on its own doesn’t create a very good sounding snare. Adding a sharp “snap” to the front of the sound helps to make the snare sound more percussive. We can achieve this using an oscillator set to generate a triangle waveform, and again shape that using a GainNode as an envelope.
// …
this.osc = this.context.createOscillator();
this.osc.type = 'triangle';

this.oscEnvelope = this.context.createGain();
this.osc.connect(this.oscEnvelope);
this.oscEnvelope.connect(this.context.destination);
We have created this graph of nodes for our snare sound:
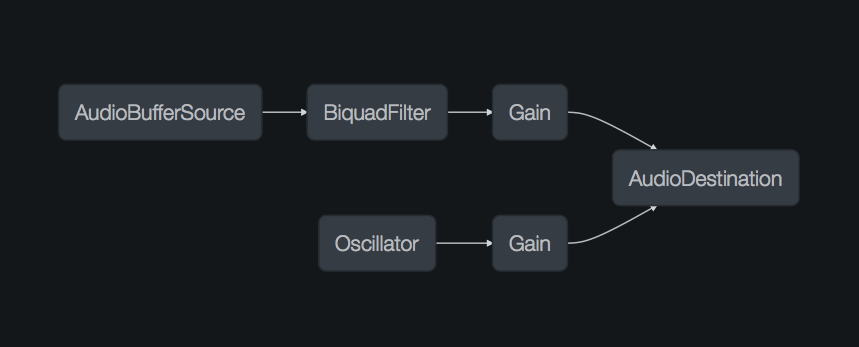
Now we just need to provide some parameters for each of the nodes. After some fiddling, I found these parameters created quite a satisfying, snappy snare:
Snare.prototype.trigger = function(time) {
	this.setup();

	this.noiseEnvelope.gain.setValueAtTime(1, time);
	this.noiseEnvelope.gain.exponentialRampToValueAtTime(0.01, time + 0.2);
	this.noise.start(time)

	this.osc.frequency.setValueAtTime(100, time);
	this.oscEnvelope.gain.setValueAtTime(0.7, time);
	this.oscEnvelope.gain.exponentialRampToValueAtTime(0.01, time + 0.1);
	this.osc.start(time)

	this.osc.stop(time + 0.2);
	this.noise.stop(time + 0.2);
};
The hi-hat
Synthesising a realistic-sounding hi-hat is hard. When you strike a disk of metal the sound that is produced is a complex mixture of unevenly-spaced harmonics which decay at different rates. It’s not an impossible task, and if you’re interested there’s some further reading below, but for this post we’re going to cheat a little by sampling an existing sound. By doing this you’ll also learn how sampling, taking short recordings of sound and using them as the basis of new sounds, can be achieved with the Web Audio API.
Our basic instrument is simple:
function HiHat(context, buffer) {
	this.context = context;
	this.buffer = buffer;
};

HiHat.prototype.setup = function() {
	this.source = this.context.createBufferSource();
	this.source.buffer = this.buffer;
	this.source.connect(this.context.destination);
};

HiHat.prototype.trigger = function(time) {
	this.setup();
	this.source.start(time);
};
When we instantiate the HiHat object, we give it a buffer of samples. The setup function assigns the buffer of samples to a BufferSource node, and calling trigger plays the samples back at the given time.
Where do we get our source buffer of samples from? Remember from our snare drum example earlier, we generated a buffer using a random number generator. But we can also create one by loading a file:
var sampleLoader = function(url, context, callback) {
	var request = new XMLHttpRequest();
	request.open('get', url, true);
	request.responseType = 'arraybuffer';
	request.onload = function() {
		context.decodeAudioData(request.response, function(buffer) {
			callback(buffer);
		});
	};
	request.send();
};
This function takes a URL of a sound file and makes an asynchronous GET request for it using XMLHttpRequest. When the data is loaded, the call to context.decodeAudioData turns the audio file into a buffer of samples, and triggers a callback. The file formats that decodeAudioData understand are the same as those supported by the <audio> tag in your browser. In Opera, OGG, WAV and MP3 are supported, for example.
Remember that the network and decoding requests are asynchronous, so we have to wait until they are completed before we can create the HiHat that uses the loaded buffer:
sampleLoader('./hihat.wav', context, function(buffer) {
	var hihat = new HiHat(context, buffer);
	hihat.trigger(context.currentTime);
});
Timing
In this final section, we’re going to combine the three drum sounds we’ve made into a simple loop. As we’ve seen, the Web Audio API provides a precise timing mechanism which allows you to schedule audio events to happen relative to the AudioContext’s currentTime.
Internally, the browser is executing these events on a thread that is separate to the thread in which normal JavaScript events are run. This means that there is overhead in passing data between the two threads. For this reason, it is not possible to create a callback that fires when an audio event happens (such as when one of our drum sounds starts or stops playing), and register changes in reaction to this (such as scheduling a new drum sound to play).
To build a loop, especially one where we have control over the tempo, the parameters, and which notes play, we have to listen for changes in the main thread, and schedule those changes to happen in the future on the audio thread. We don’t want to schedule them too far in the future though, as this makes our application unresponsive. Scheduling them too soon is also a problem — we might cause glitches in the sound if something happens in the rest of our application and we miss the scheduling of the changes.
In this HTML5 Rocks article, Chris Wilson describes the issues with timing in more detail and gives some code examples of good and bad practice. Other developers have taken these ideas and wrapped them up in libraries that make working with time in Web Audio applications much easier:
- WAAClock packages the ideas from Chris Wilson’s article into a library, with a simple interface and some clear examples.
- Dilla is a timing library specialised for building drum machines. It models the concept of beats, bars, and loops and has a notation language for describing the timing of sounds in the loop.
- Tone.js is a comprehensive set of libraries for making all kinds of sounds. As well as a timing library, it also has built-in synthesisers and effects processors which provide abstractions over more complicated Web Audio node graphs.
All of these libraries make it easy to build a simple loop, and it’s a fun exercise to try each one and see which one is the best fit for you and the application you are building. As an example, I’ll use Tone.js to build a simple loop.
var play = function(buffer) {
	var kick = new Kick(context);
	var snare = new Snare(context);
	var hihat = new HiHat(context, buffer);

	Tone.Transport.bpm.value = 120;

	Tone.Transport.setInterval(function(time){ kick.trigger(time) }, '4n');
	Tone.Transport.setInterval(function(time){ snare.trigger(time) }, '2n');
	Tone.Transport.setInterval(function(time){ hihat.trigger(time) }, '8t');

	Tone.Transport.start();
};

sampleLoader('./hihat.wav', context, play);
In this code, Tone.Transport is the interface to the Tone.js timing library. We set a tempo for our loop using the bpm property — here 120 beats per minute. The Transport.setInterval method is used to schedule repeating events. We can think of it as working like a regular setInterval but for scheduling of events relative to the audio clock. The time value passed to Transport.setInterval can be expressed, as here, in a musical way rather than in seconds. 4n means 4 beats to the bar, 2n is two beats and 8t creates eighth-note triplets on the hi-hat. The value is converted into seconds and passed in as the time parameter to our trigger methods, so we don’t need to modify our code to work with this library.
Finally, we call the play method when the hi-hat sample has loaded, which starts our loop. We haven’t loaded Tone.js into this page, so if you’re following along in the console, try the code on the demo site.
Conclusion
In this article we’ve seen how to synthesise and sample drum sounds and combine them as a loop. We’ve learnt the basics of the Web Audio API and seen how to solve some common problems. If you’d like to play with the code and hear it in action, I’ve put it on GitHub, and if this article has piqued your interest in the Web Audio API, you might be interested in my weekly newsletter Web Audio Weekly where I share links, tips and news from the Web Audio community.
Further Reading
We’ve only scratched the surface of drum synthesis in this article. For further details you might find these resources helpful:
- The Synth Secrets series from Sound on Sound magazine is a goldmine of interesting articles on synthesis using hardware synthesisers. With some thought, many of the techniques can be recreated using the nodes provided by the Web Audio API. The articles on synthesising a snare drum, kick drum and cymbal were very useful for this blog post.
- The Dance Music Manual by Rick Snoman is an in-depth look at electronic music production and has a very informative section of drum machine synthesis.